Intelligent Control IoT Center
ECE5725 Final Project
Ziran Zhang and Boteng Yao
Demonstration Video
Introduction
In this project, we are going to design and implement an intelligent IoT control center, which covers machine learning, computer vision, GPIO control and web/app design.
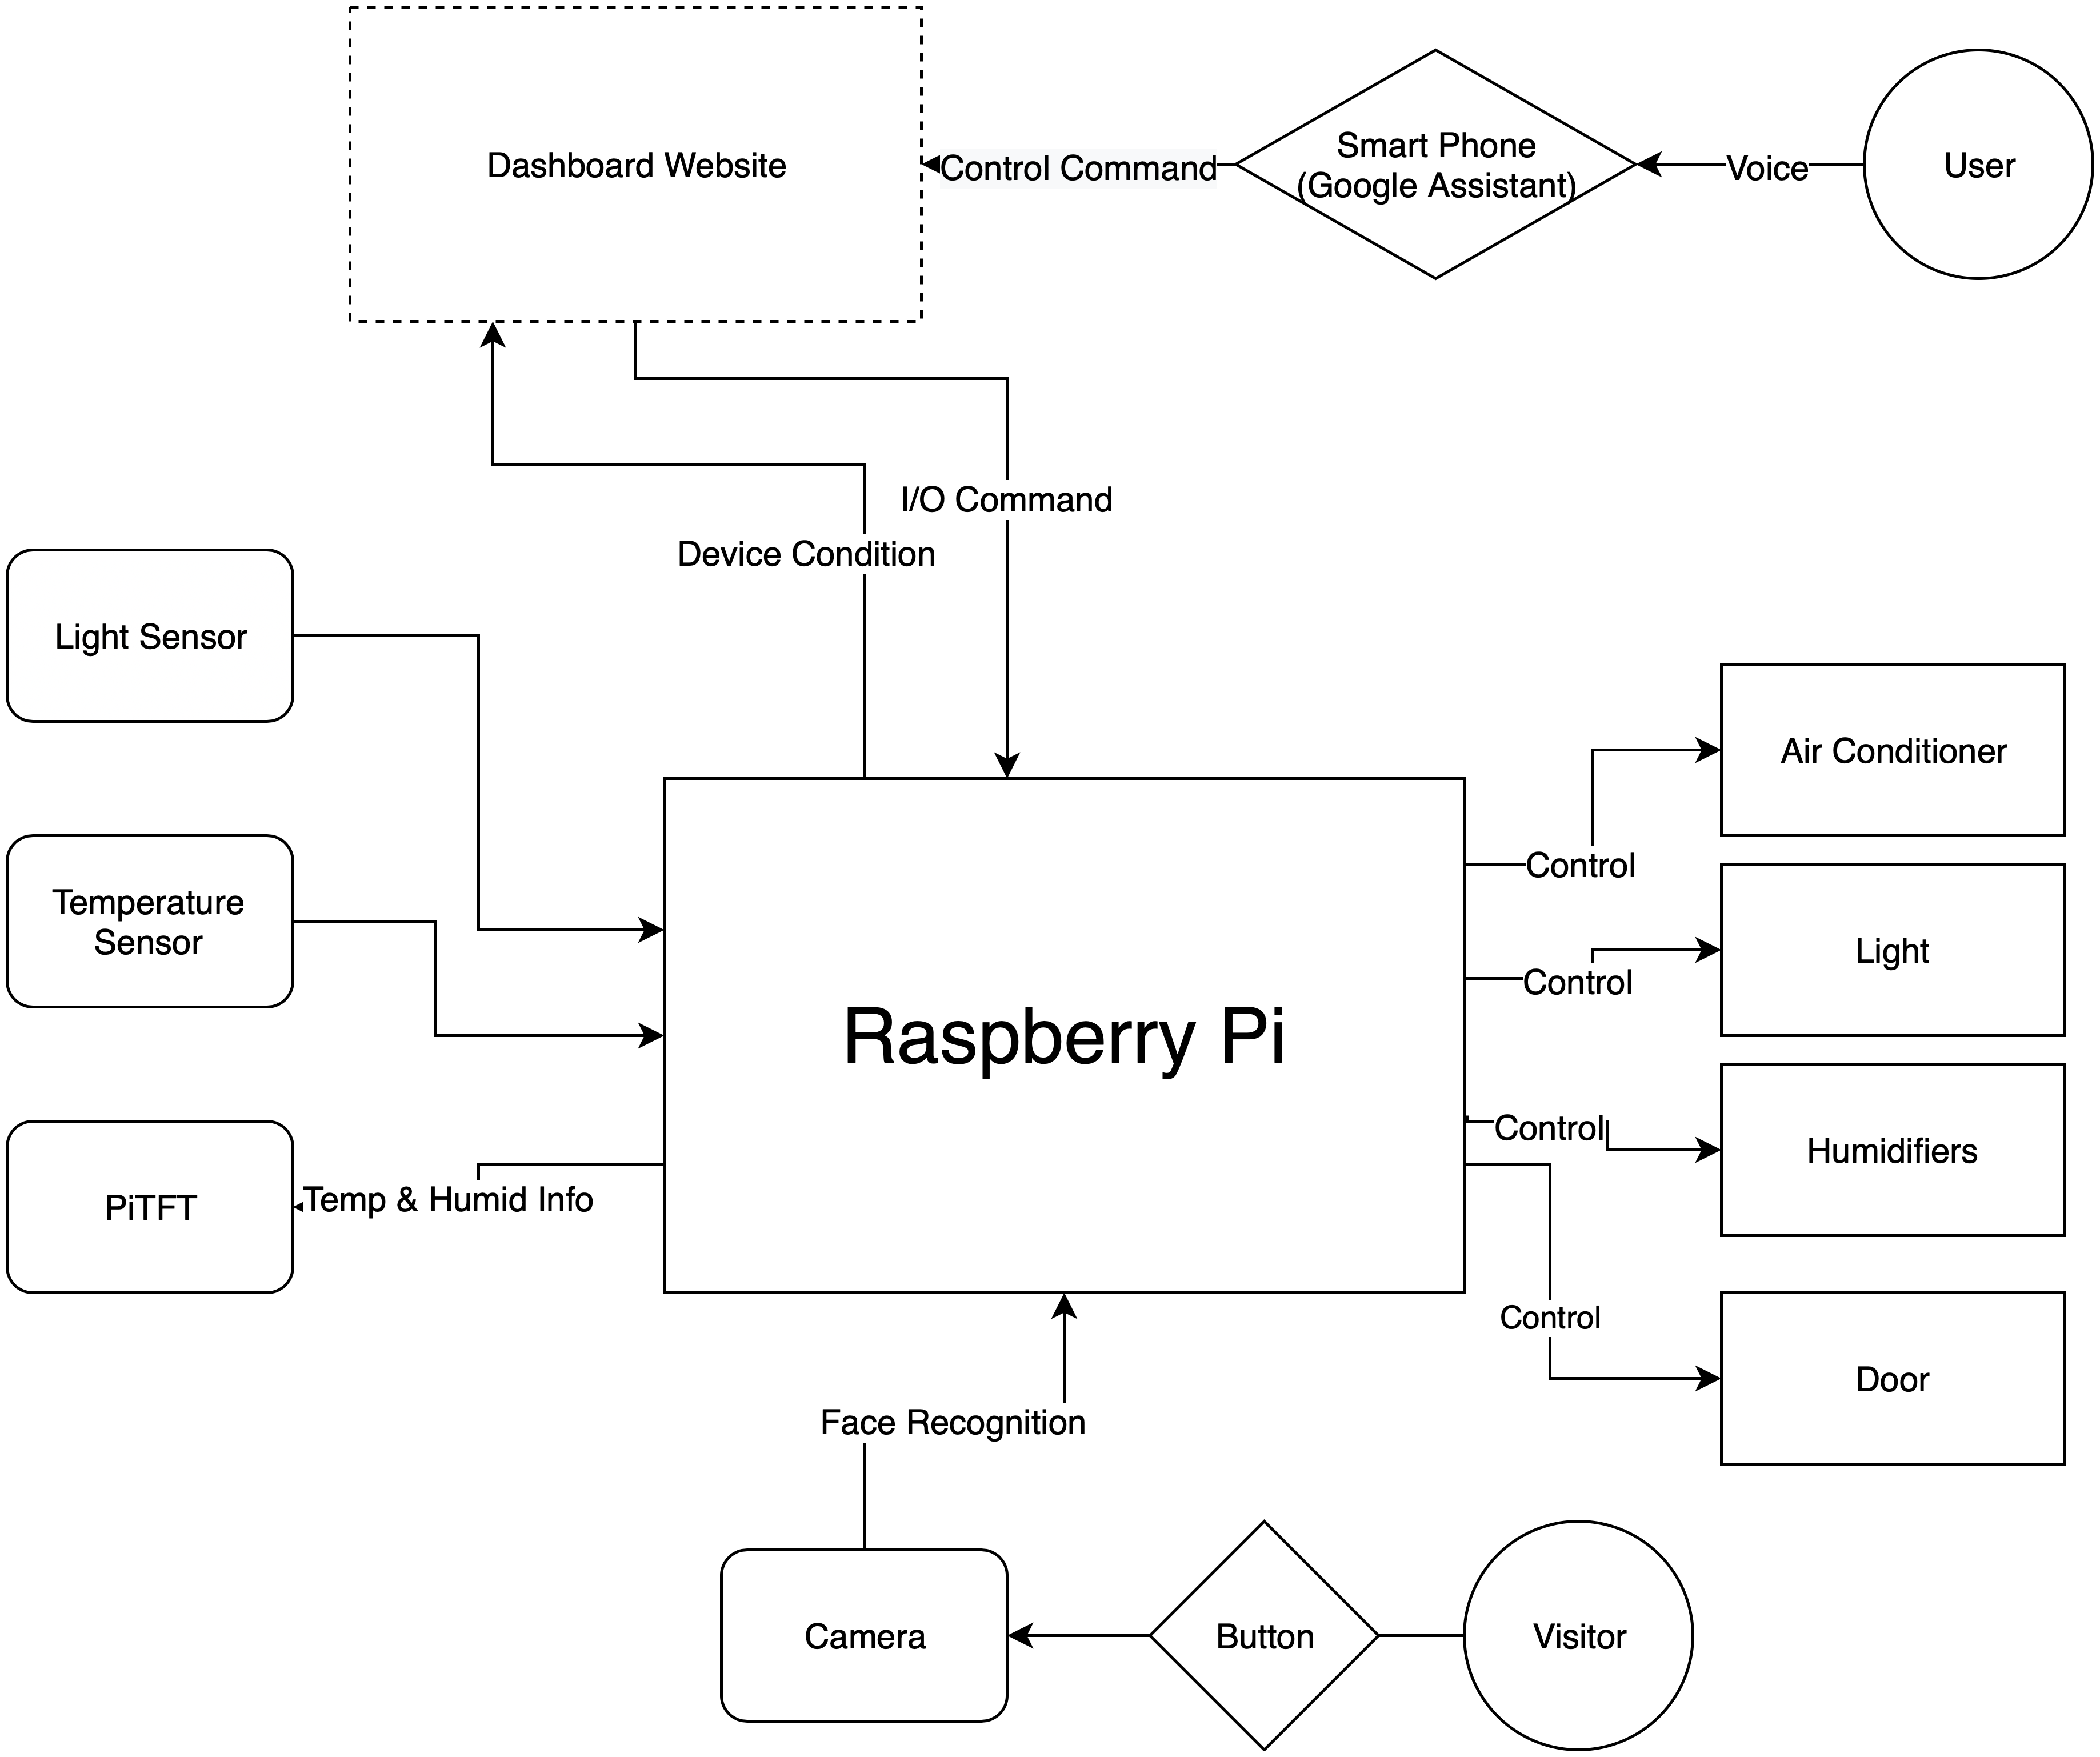
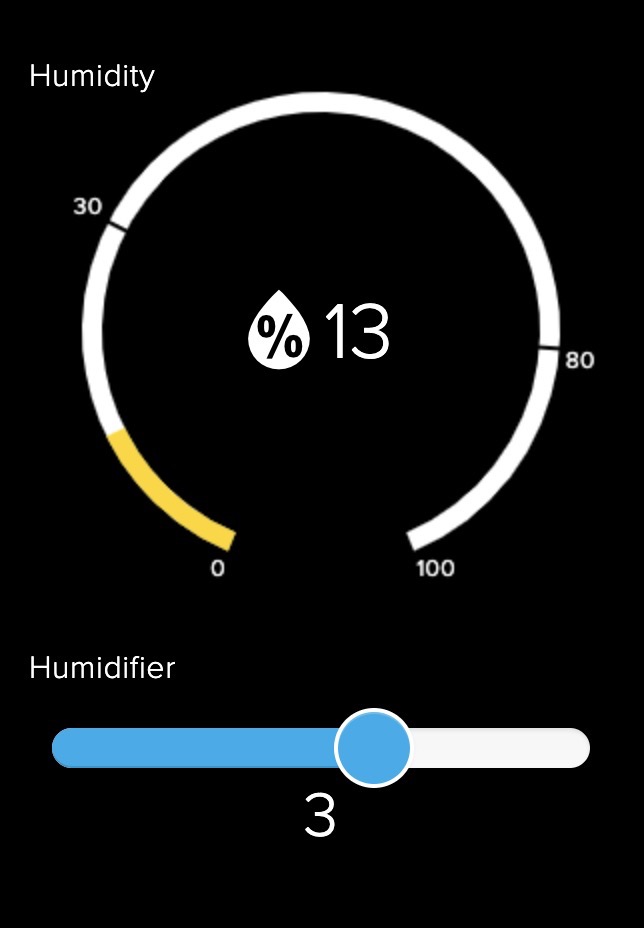
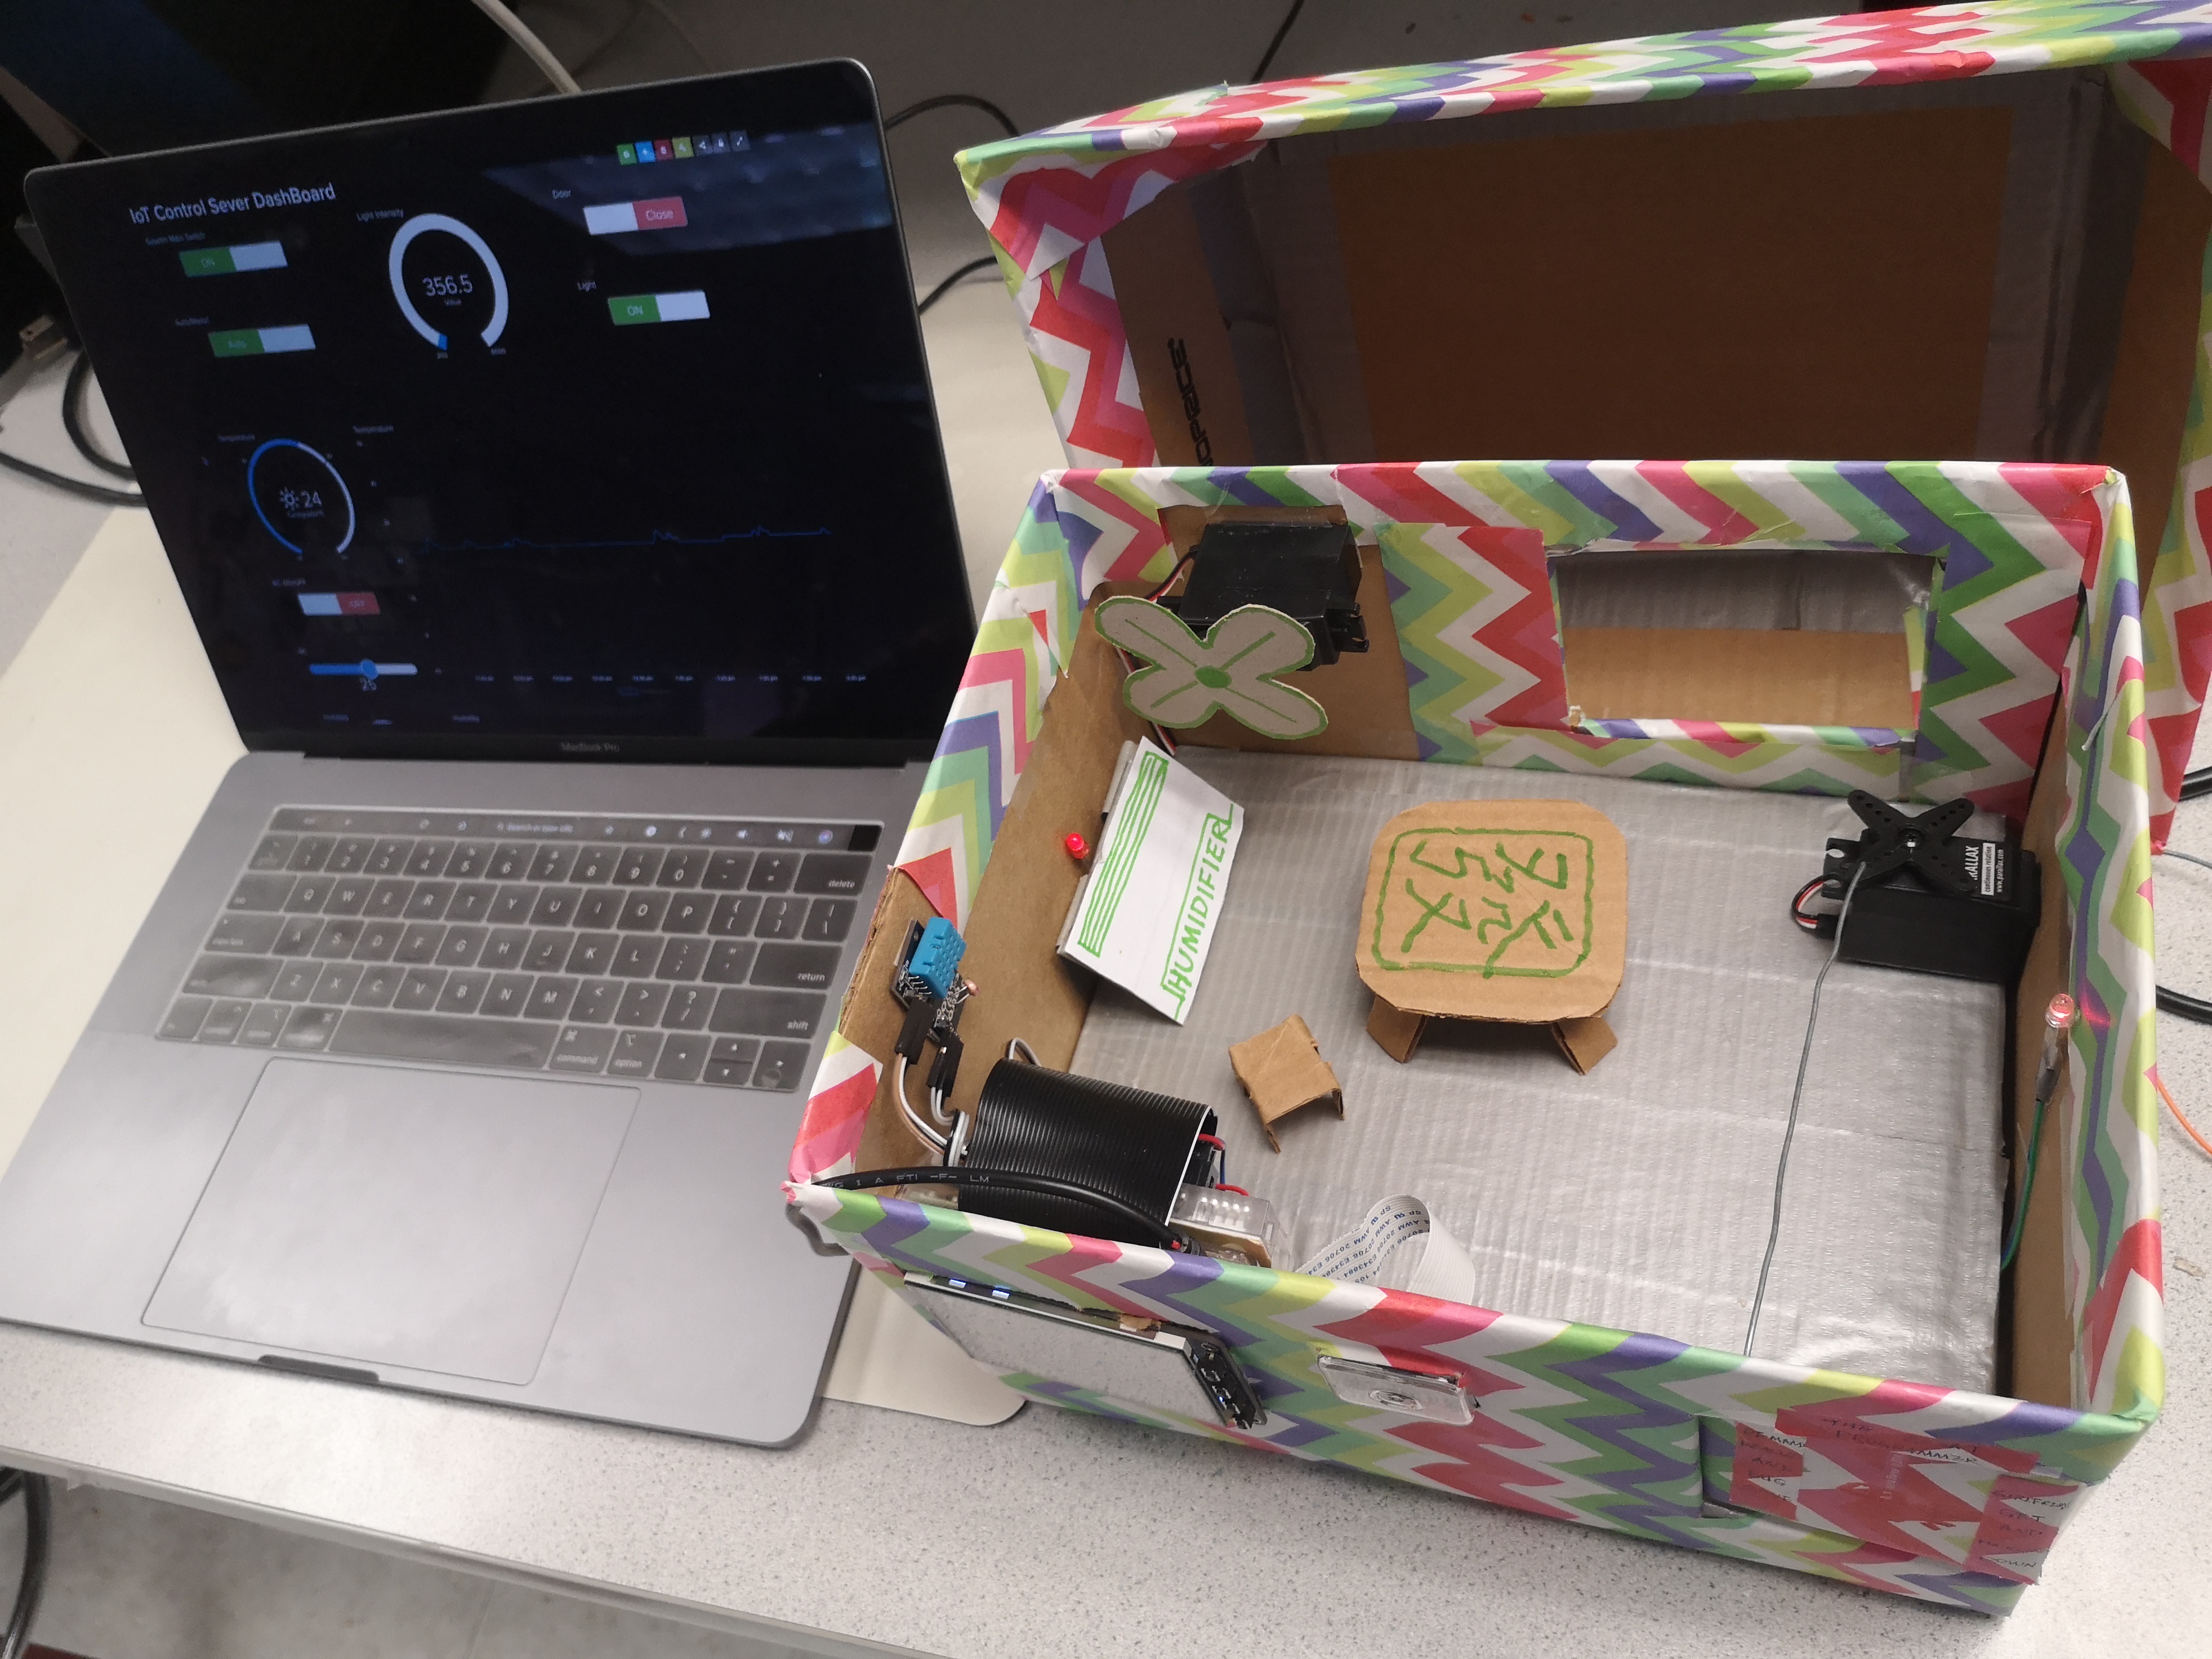
In the design, the user uses his smart phone to control the whole system. First, the system will open or close on the phone by the user. After the system open, it can be directly control by the phone user. By speaking to voice assistant in the smart phone, the raspberry pi can control the air conditioner, humidifier, lights and door. All the equipment information will be displayed on a website served by the Pi, and the website can also control the devices. There’s a TFT showing the temperature information, once it’s touched, it would switch to humidity info.
Definitely, the control center possesses an auto mode. When the light senor detects the light is too faint, the Pi will open the light to make the room lighter; when the temp sensor detects the room is too cold or hot, it will open the air conditioner and set it into heating or cooling mode. For the humidifier, it works as the same way. The door can be opened by the controller of the owner on the website/phone. For the visitors, it needs them to verify their identity. By pressing a button, Pi will identify the visitor and decide to open the door or not. The recognition system will be developed by Machine learning and open CV.

Project Objective:
- Users can control all devices in different ways, including on website and voice control.
- The center can control all devices intelligently by analyzing the information from integred sensors.
- Using Open CV and Machine learning method to identify different people (door open).
- PiTFT can show necessary information for users.
To build a IoT control center based on Raspberry Pi to control various of household equipments in an intelligent way.
Design & Testing
The following tables show the design, develop and test procedure of the project:
| Time | Tasks |
|---|---|
| 11/17 | Allocate Open CV and train the face recognition model, design the total frame work of the project. |
| 11/24 | Test all components and make them work, including sensors and camera, trainning the identification model by the photos generated by Pi camera. |
| 11/28 | Develop a website dashboard and connect it with google assistant, connect the assistant with dashboard (Adafruit IO) with IFTTT, make the voice control available. |
| 12/04 | Develop the intelligent control model with sensors, display necessary sensors information on PiTFT. Wire up all the basic components, finish all the code part of the project. | 12/10 | Final tests and decoration |
| 12/11 | Demo |
Project design structure
1. Face recognition
OpenCV and Rpi camera are used for face recognition. A pre-built OpenCV package for Python - opencv-python is used. In order to recognize different people, we need to build the training data sets, then the prepossessed data sets need to be used to train a face recognition model. The following shows the detailed work flow.
At first, 100 images of each person are collected by Raspberry Pi Camera v2, then a face classifier from OpenCV - “haarcascade_frontalface_default.xml” is used to detect and generate the gray images of different faces. Acturally, at the beginning, we just used 20 images, which is not enough.
    import cv2
    recognizer = cv2.face.LBPHFaceRecognizer_create(neighbors=10)
    detector= cv2.CascadeClassifier("/path/haarcascade_frontalface_default.xml")


After the data is prepared well, Local Binary Patterns Histograms (LBP) algorithm is used to recognize. Images of the same person have the same ID, and these information is used to train the model. During recorgnizing, it is important to set the confidential score appropriately.
    faces,Ids = getImagesAndLabels('/path/DataSet') #labeled data
    recognizer.train(faces, np.array(Ids))
    recognizer.write('/path/trainner.yml')
After the trained model (trainner.yml) is generated, it will be used to recognize different people in the video. In our design, the recognition will run 10 seconds until the right person is in front of the camera.
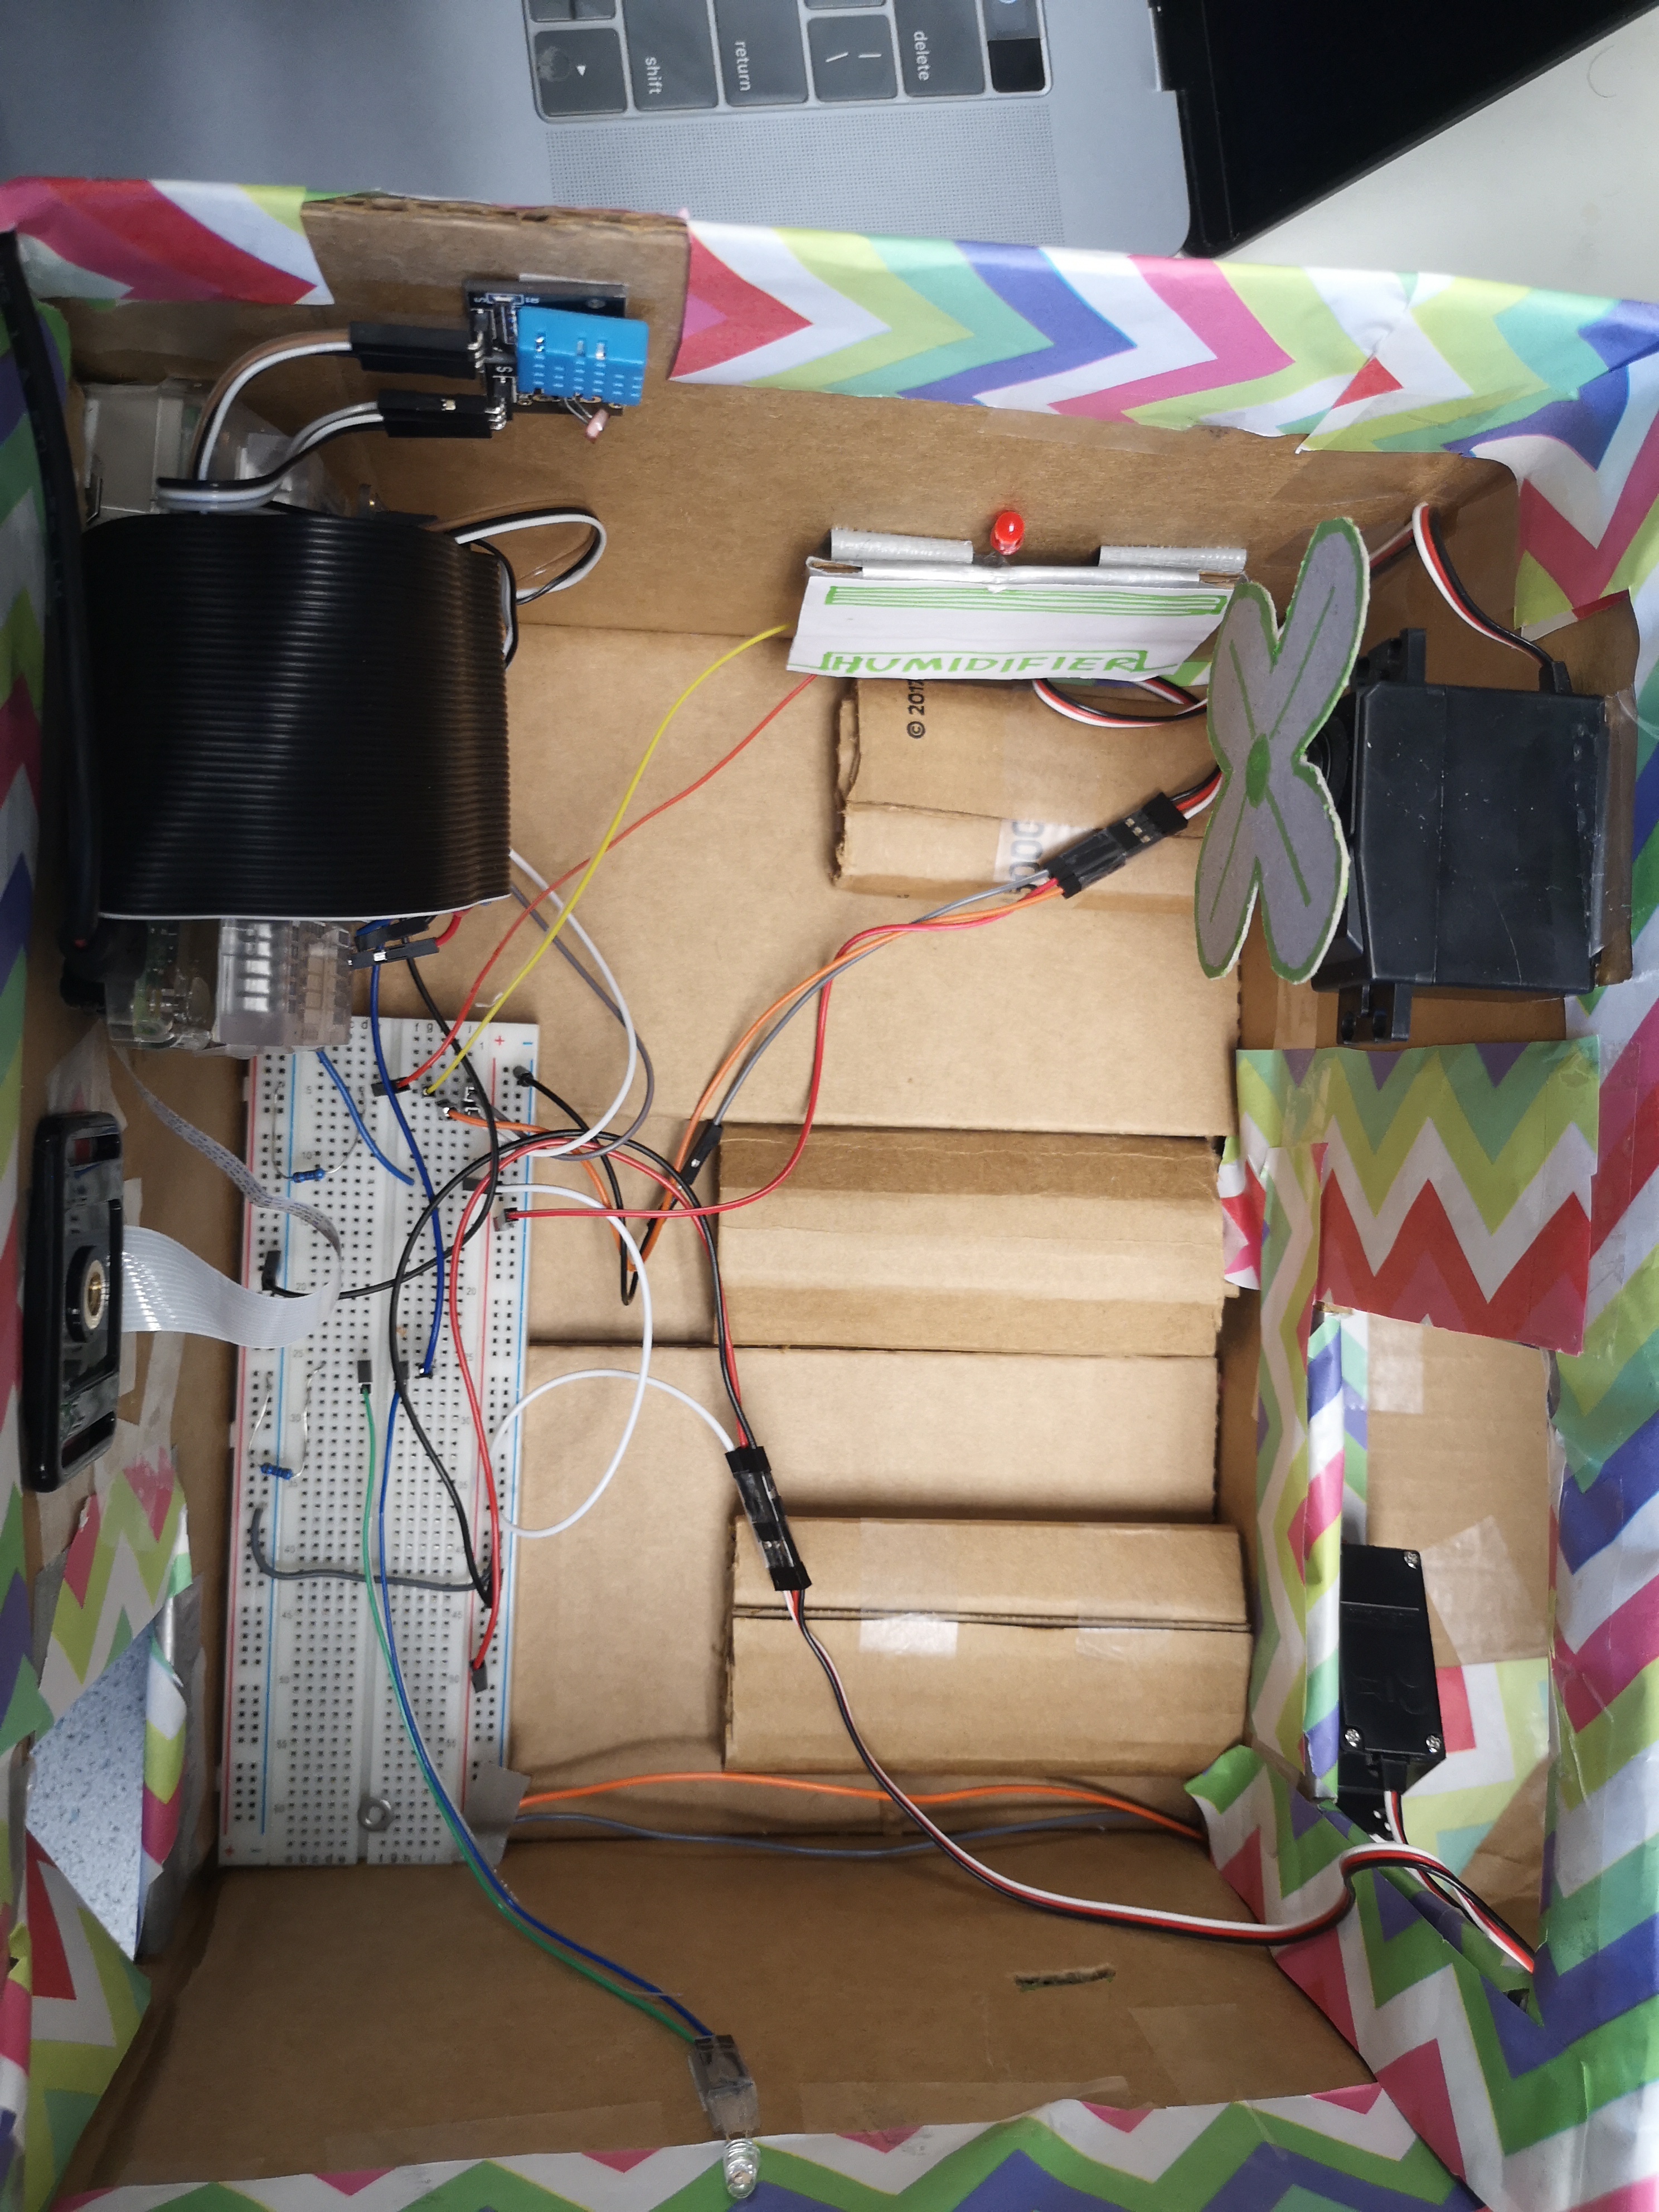
2. Sensor Integration
In this part, we made the sensor be able to get the environment information and let them control their corresponding actuators. In total, there were 2 sensors in this project, DHT and LDR. DHT was used to get the temperature information and humidity information; LDR was used to sense the intensity of light. The following is a whole picture of the design idea:
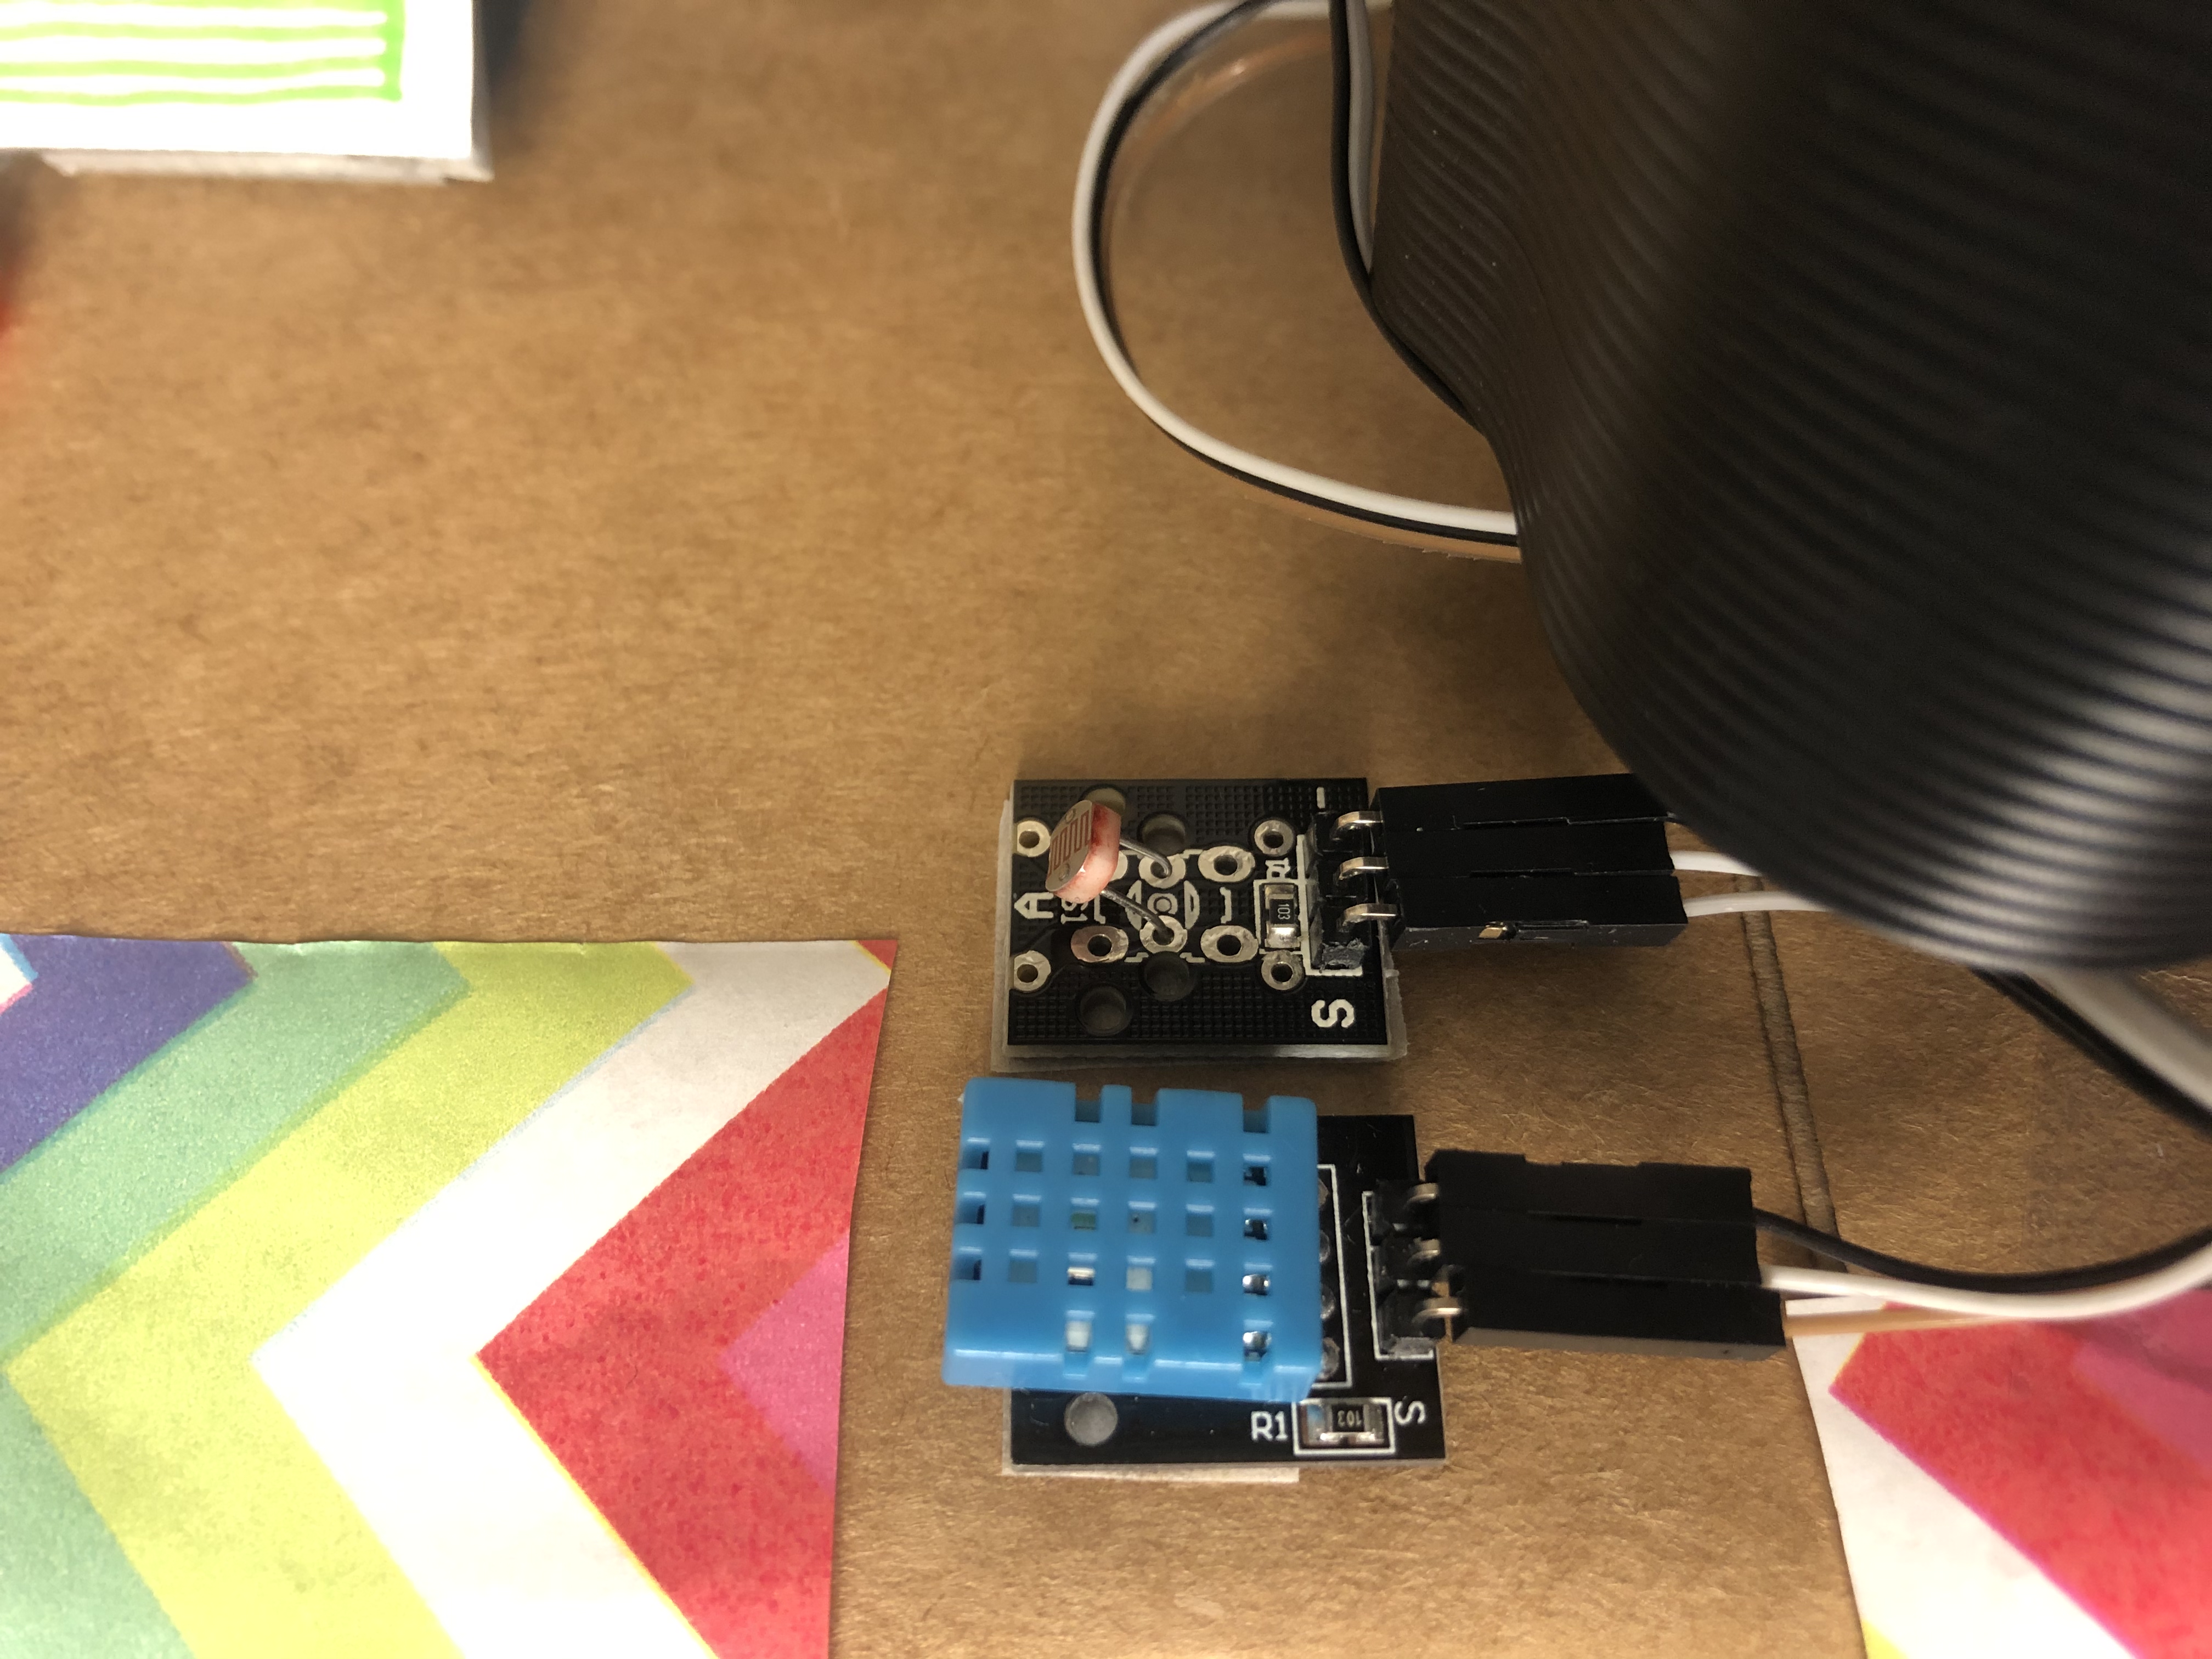
LDR and DHT
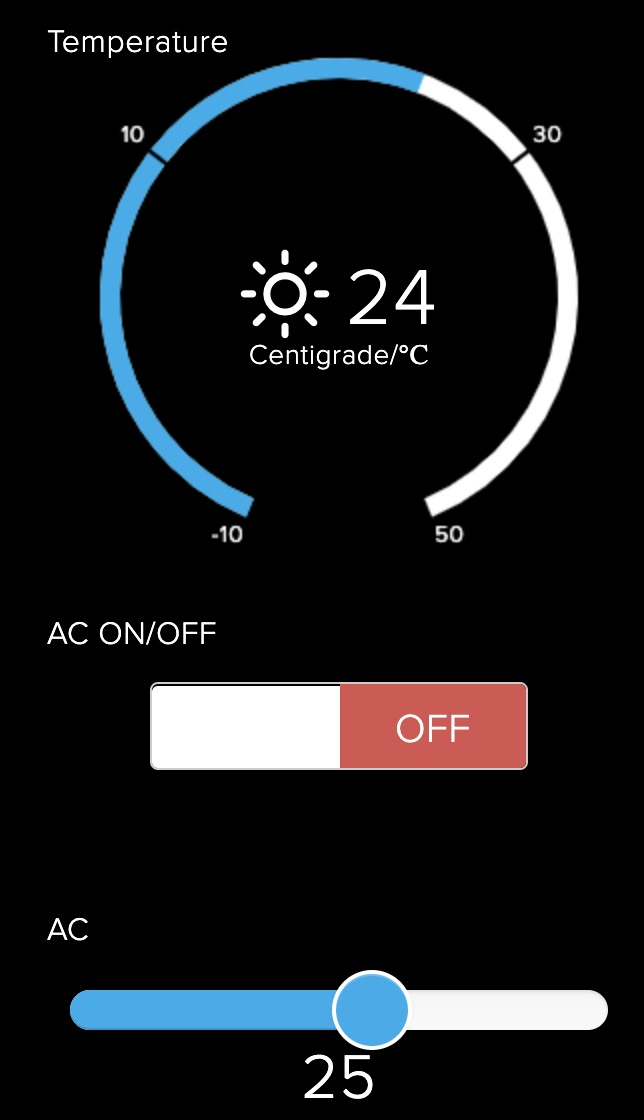
For DHT, it was designed to control 2 actuators, the air conditioner and humidifier, because it could get the temperature and humidity information. In our design, we used the DHT11, which could be found on Adafruit. By using the code and package provided by Adafruit, we could get needed information. The control logic of the actuators was also quite straightforward. For air conditioner, when the temperature went to more than 25, the air conditioner would open. As the temperature reached higher, the setting of the air conditioner would be lower in order to increase its power. The humidifier also shared a similar control method.
For LDR, it was actually a resistor which was sensitive to light. In other words, the output of the LDR was analog. By referencing learn.adafruit, we implemented a digital output LRD by adding a capacitor. By using the template code, we could get the comparative light intensity. We also used the same control strategy to control the light. These control logics were applied on the autonomous control mode for the IoT system.
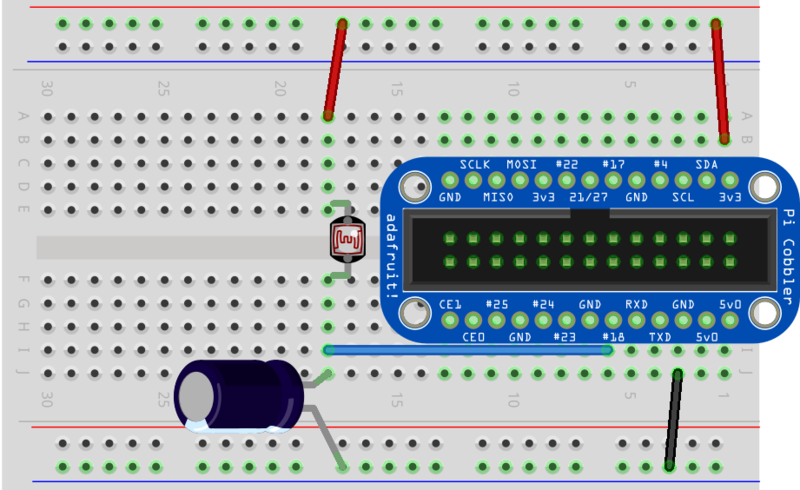
LDR circuit
3. Web and Api Developing
The web part was about the dashboard, and the API part was about the connection between dashboard and voice assistant.
For the web part, we developed the dashboard based on Adafruit IO, which provided a platform connecting the raspberry pi. For the connection, it was based on MQTT protocol. By giving the key to the pi, the pi could receive information from the dashboard, which was implemented as callback function, and the dashboard can give command to the Pi. After the connection had been built, we added several widgets to the dashboard and make it able to record the historical information of temperature and humidity, the following is a demo figure
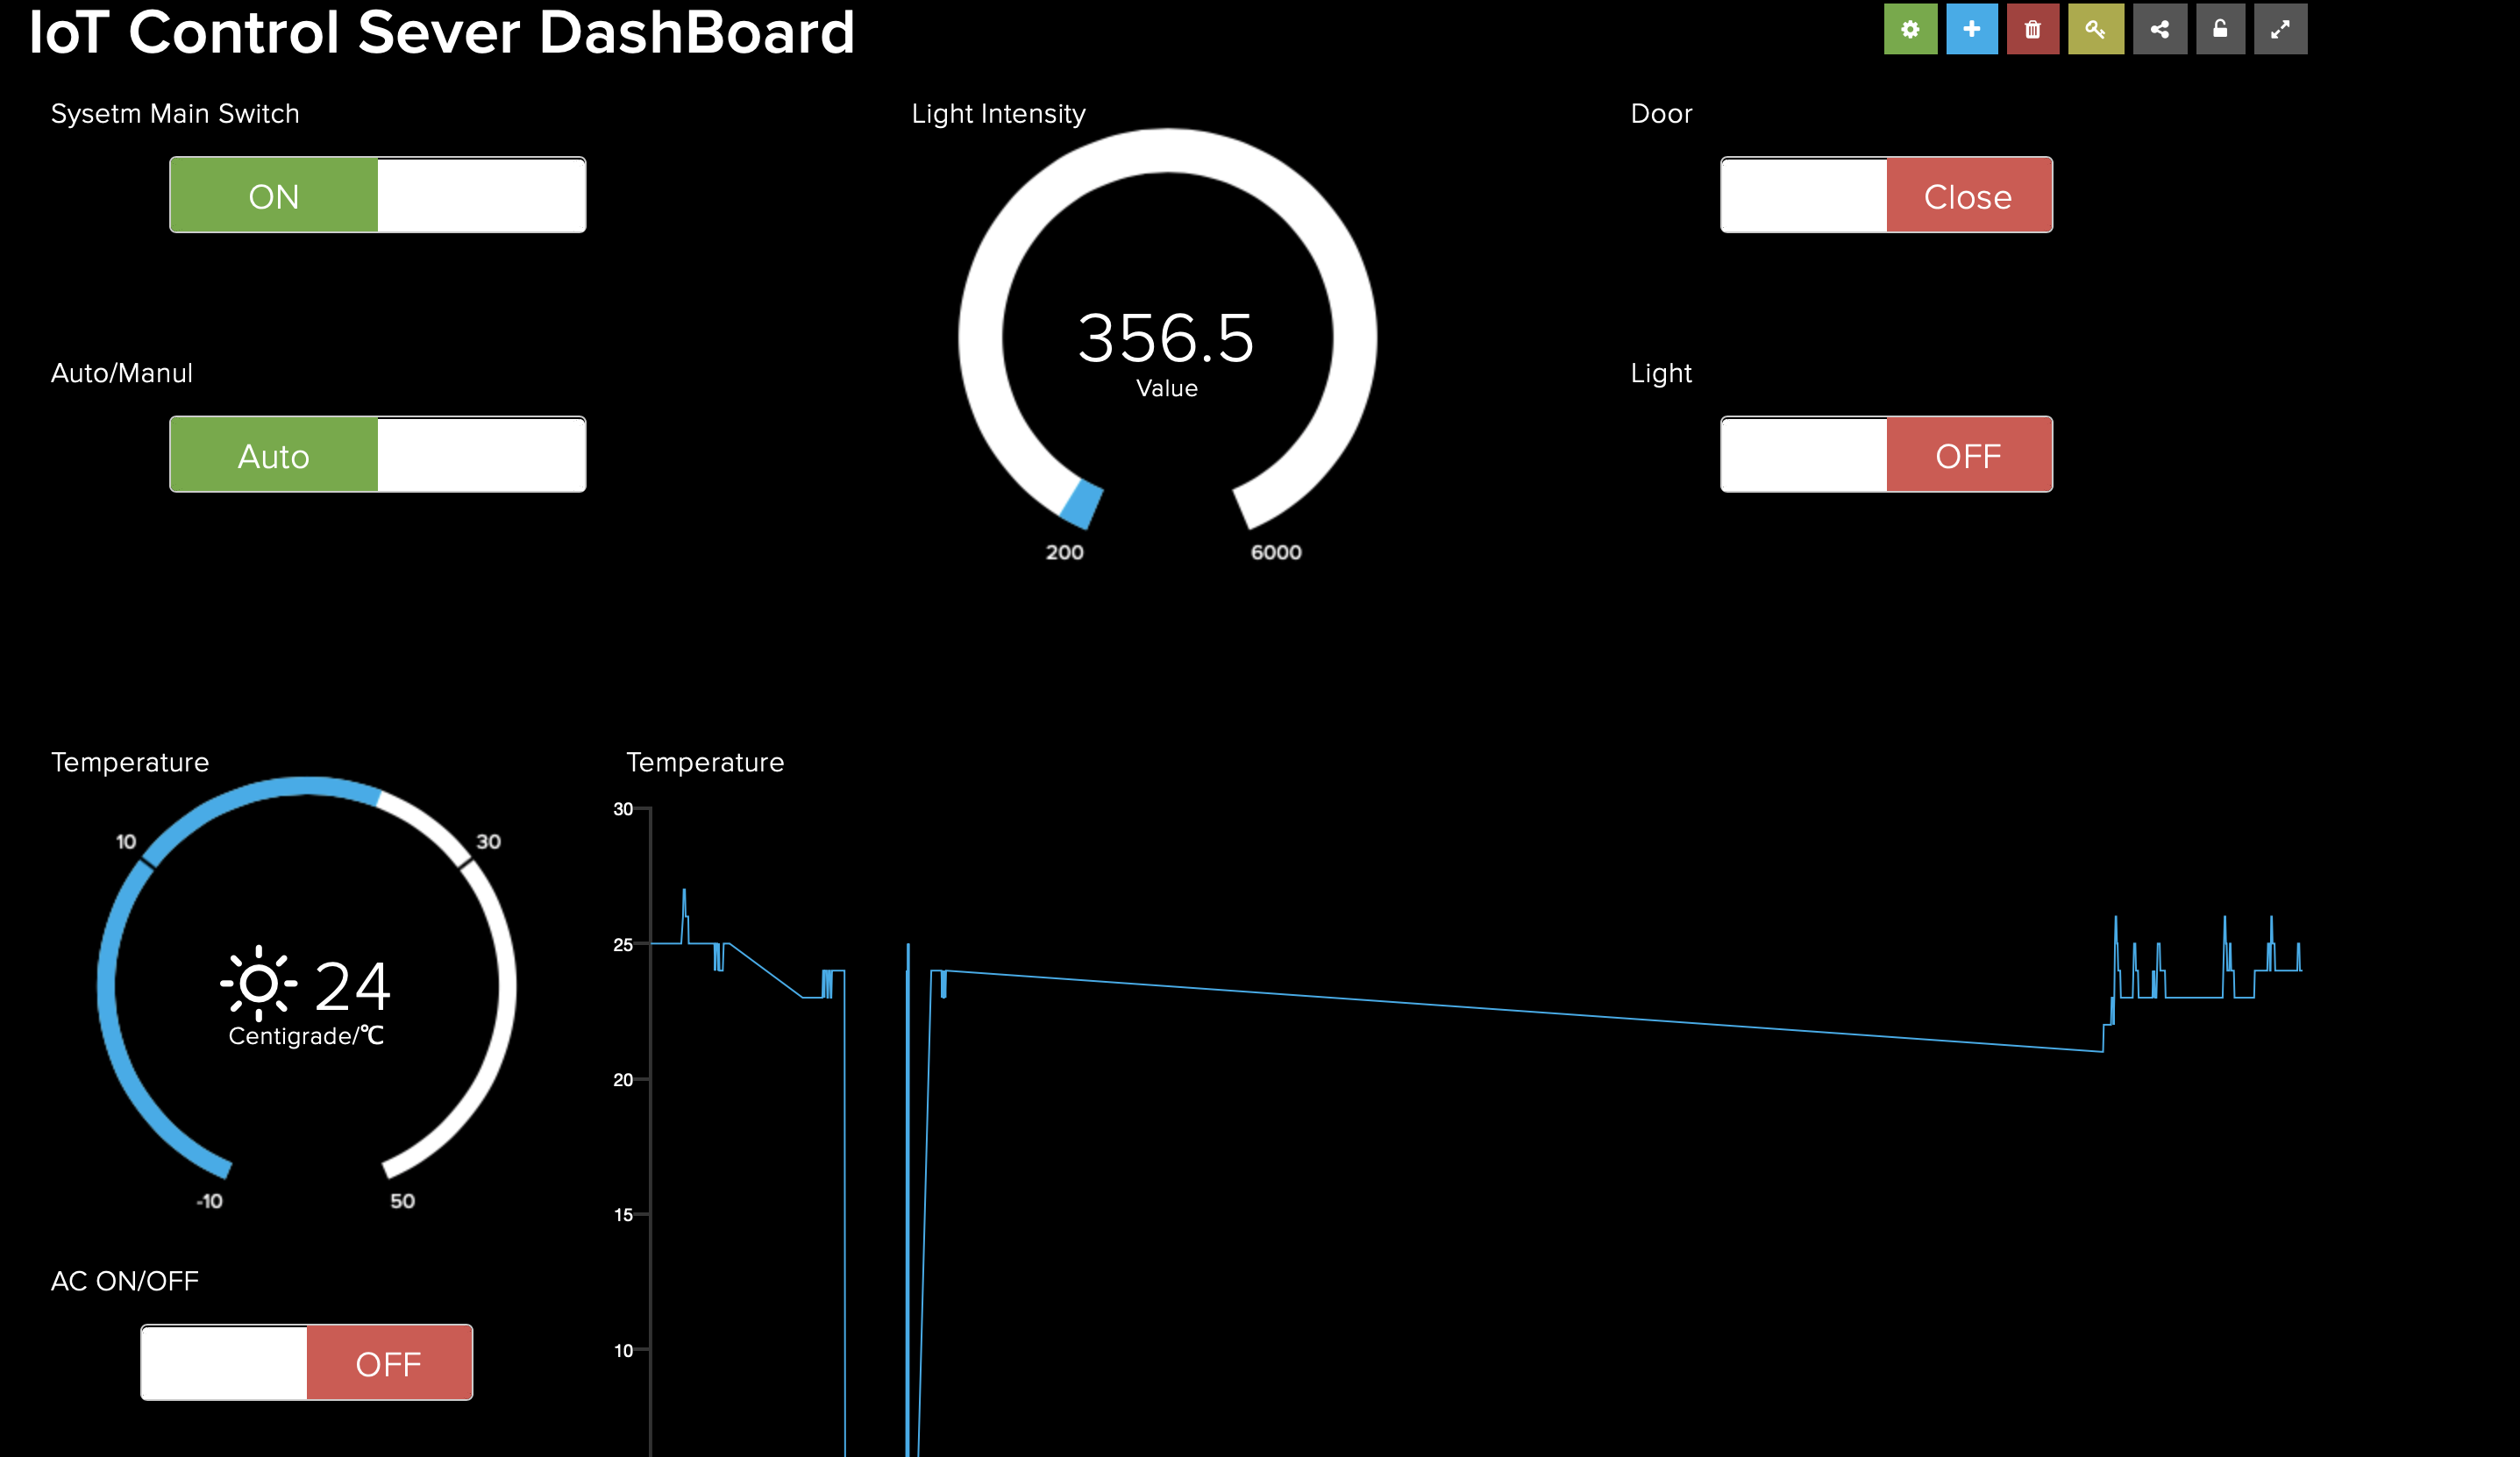
Dashboard
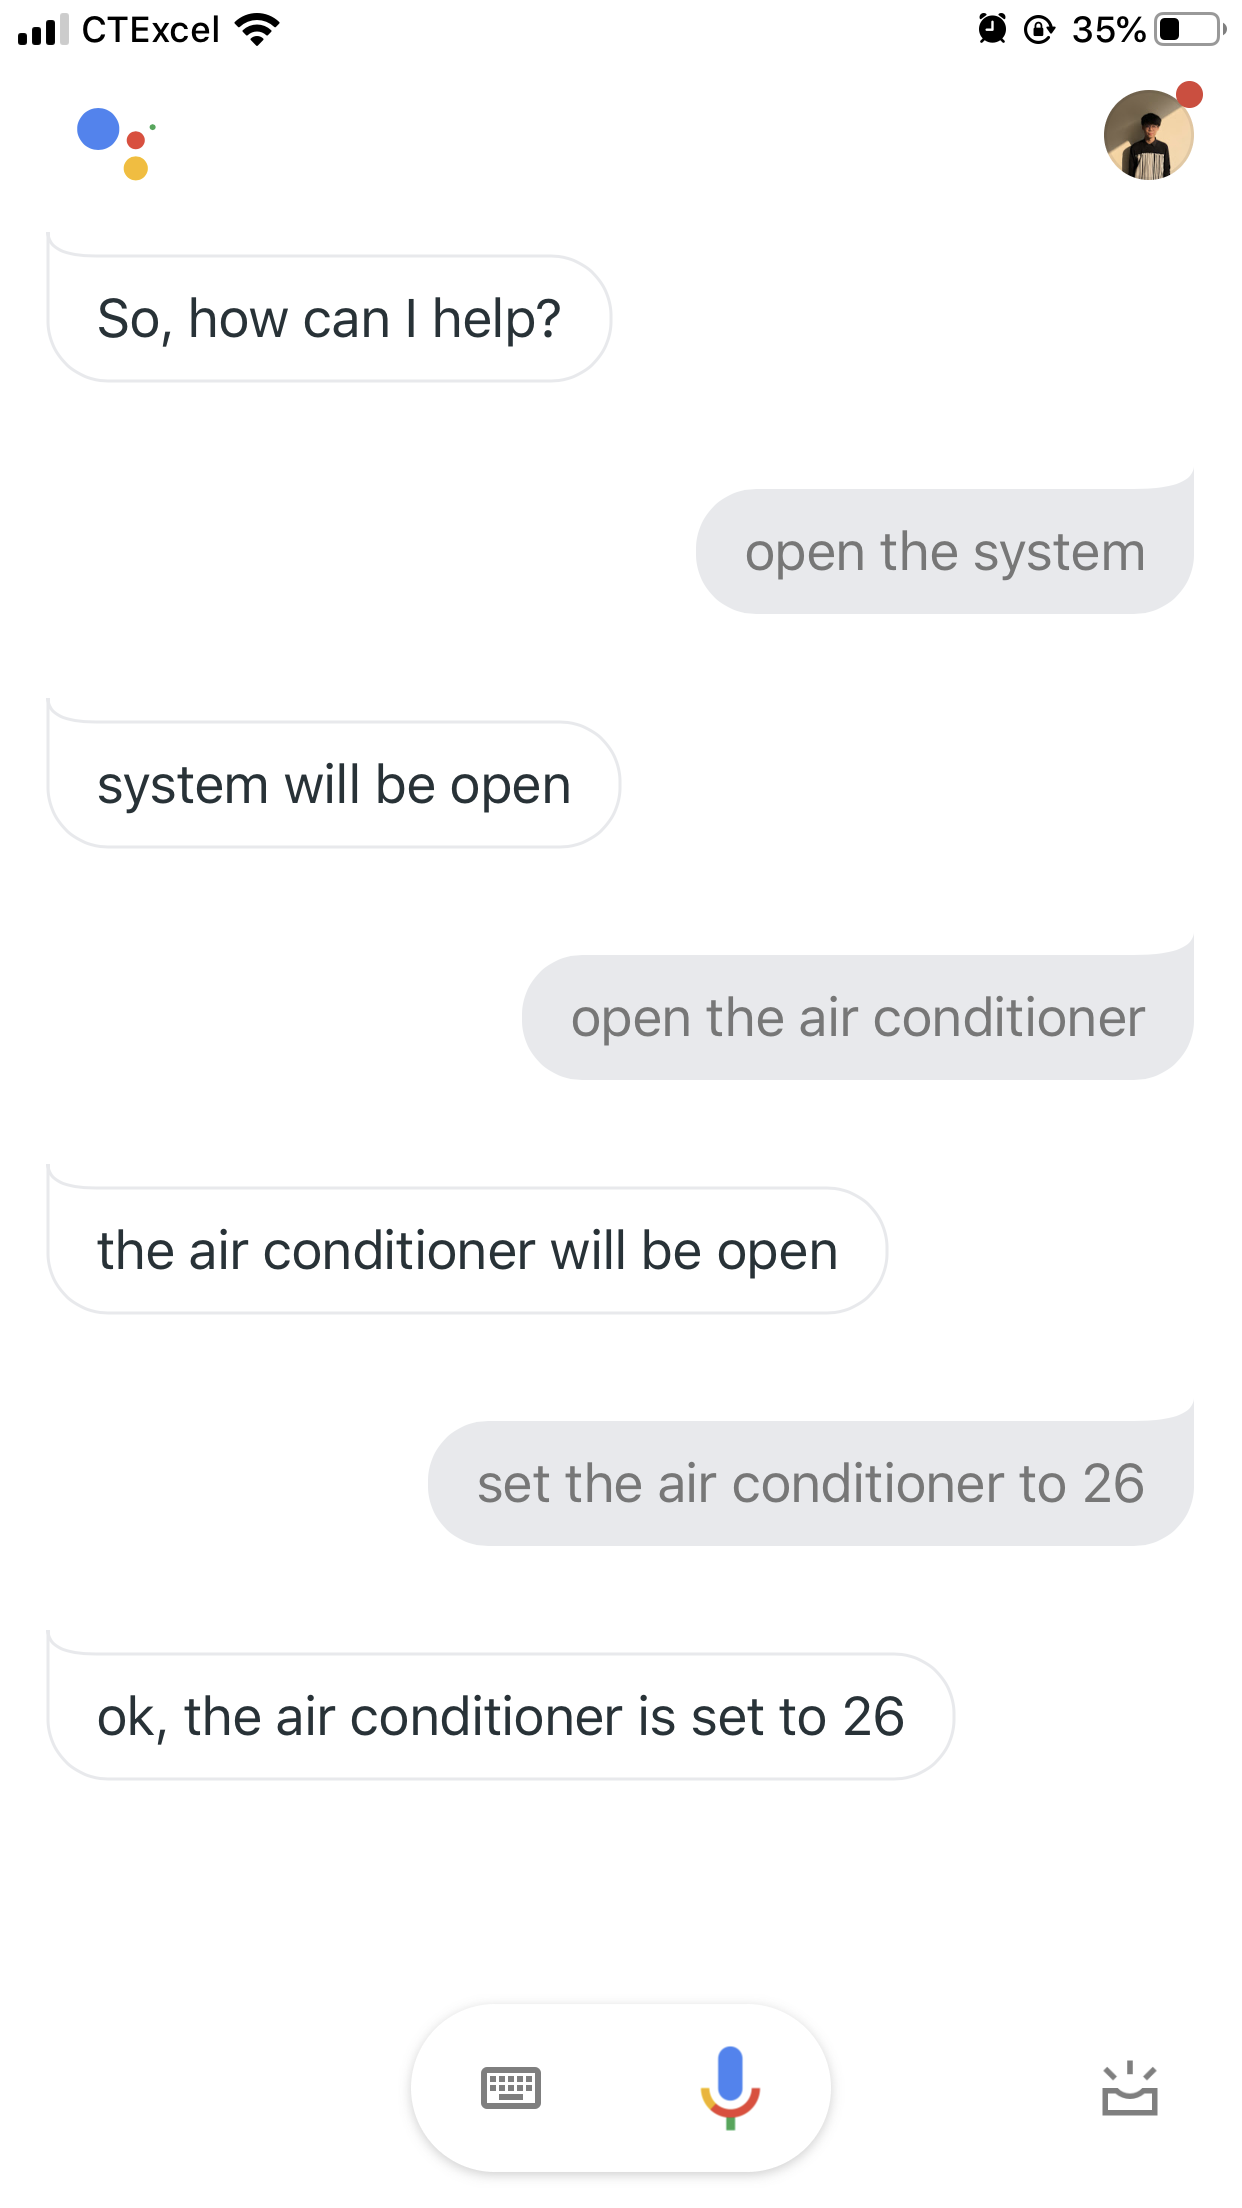
For the connection between dashboard and voice assistant, we used IFTTT as the API. IFTTT supported both Adafruit IO and Google assistant, so we came up the idea to control the device by the Google assistant through the dashboard, and it worked well when we tested it, and the assistant could give some feedback to the user. The detailed results were in the video.
4. Raspberry Pi Software Design
There are three main parts of our system, the main part, dashboard, and face recognition. The main function includes the control the piTFT, the interrupt of a button which leads to face recognition and some controls of GPIO. A new thread leads to the dashboard function. In defalut, the piTFT shows the temperater and humidity on the screen. When somebody wants to enter the house, a face recognition system will be triggered, the screen will show the "fave recognizing", if he/she pass the check, the screen will show "welcome back", otherwise, "Please retry" will be displayed. For the dashboard part, callback functions are used to receive messages from the website and the corresponding actions will be executed. When the doorbell is pressed, the system will start to recognize faces, the information "Face recorgnizing" is also displayed on the screen at the same time.

Program structure
The level of humidifier and target temperature of air-conditioner can be seted.
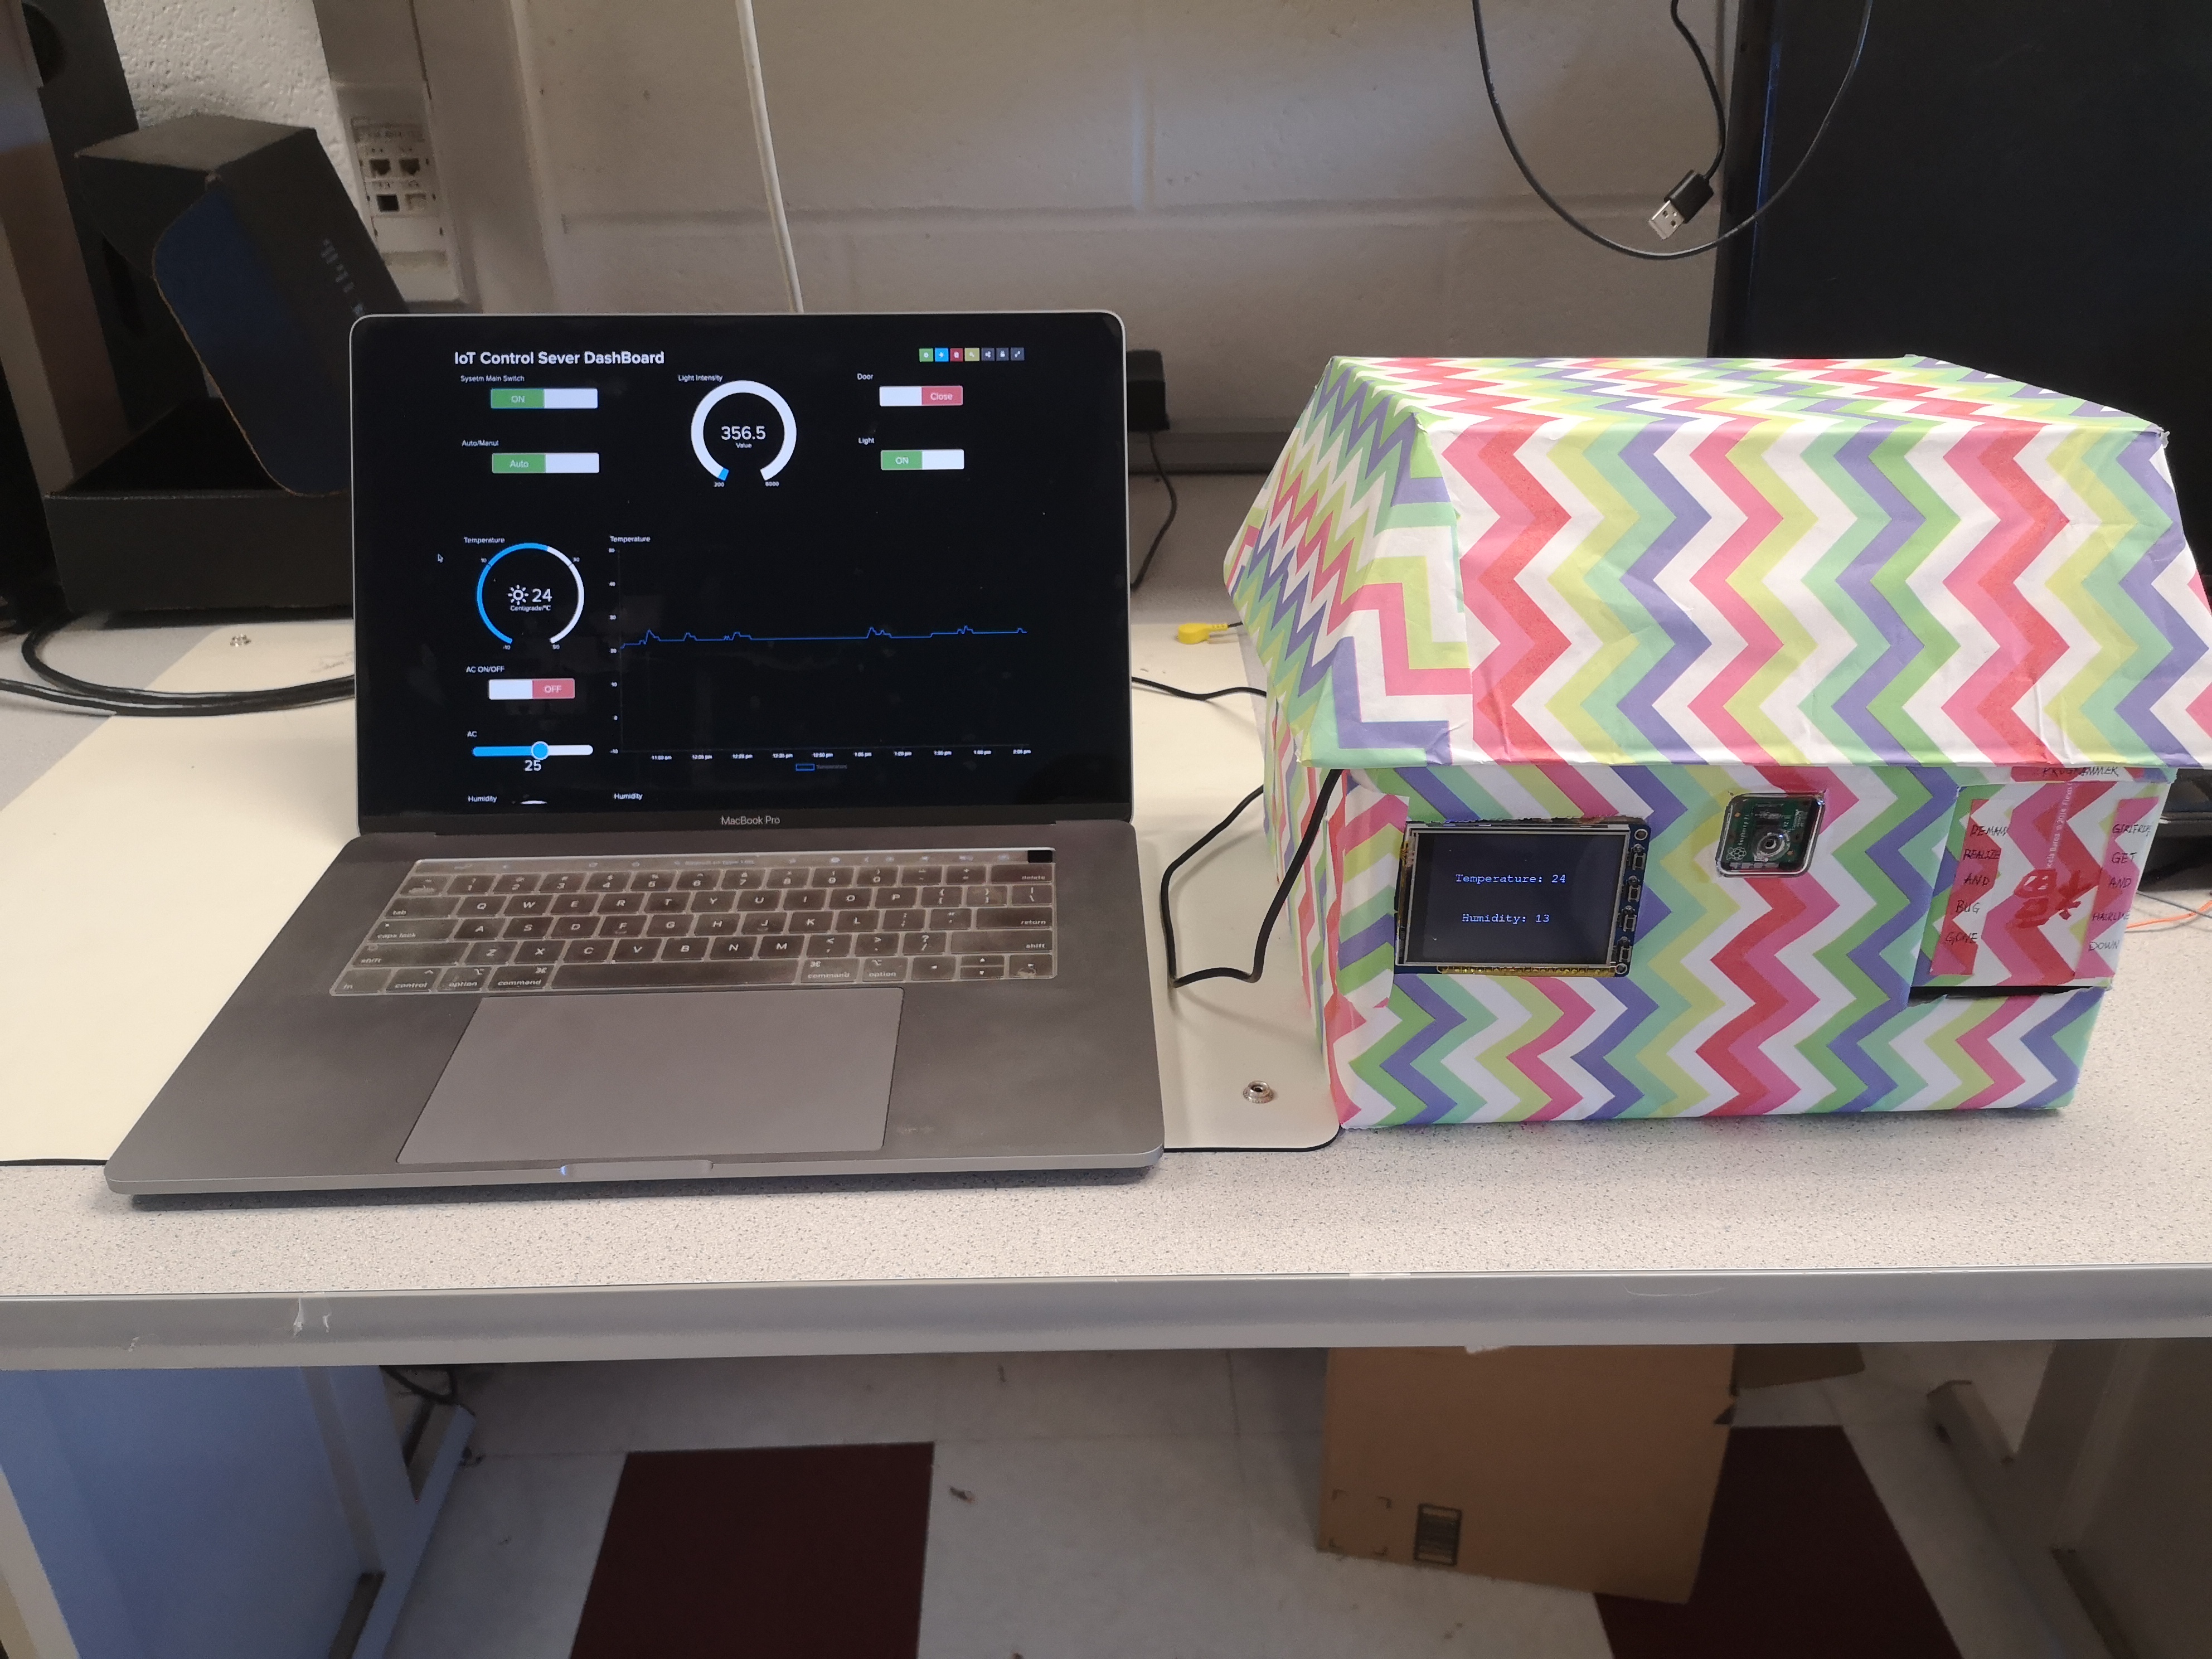
Results
Conlutions
An intelligent IOT system is designed based on Respberry Pi including the automatic and manual control of the air-conditioner, light and humidifier. A face recognition security system is integrated to control the door. The dashboard can record the status of the whole room including the light intensity, humidity and temperature. Besides, all the system parts can be controlled by voice, which is extremely convenient for users. At last, the system is modularized, we can add more parts to our systems, such as the fire detector, window controller and so on.
Future works
Although the IoT control center is multifunctional, smart and good-looking, there is still some flaws we need to patch. First, the face recognition part is not fast, and its accuracy is not very high, in the future, we may need deep learning model to improve its performance. Second, the dashboard can only be used by one account, if there are more than one user, it would cause a problem. We can develop our own website and authorize different kinds of user group. In addition, the voice assistant is connected to that account, we have to develop some new APIs to connect different accounts with different google accounts, which are linked to google assistant. Last but not least, if the above problems can be solved, the IoT control sever can designed to be a product and do real work in the house.
Work Distribution
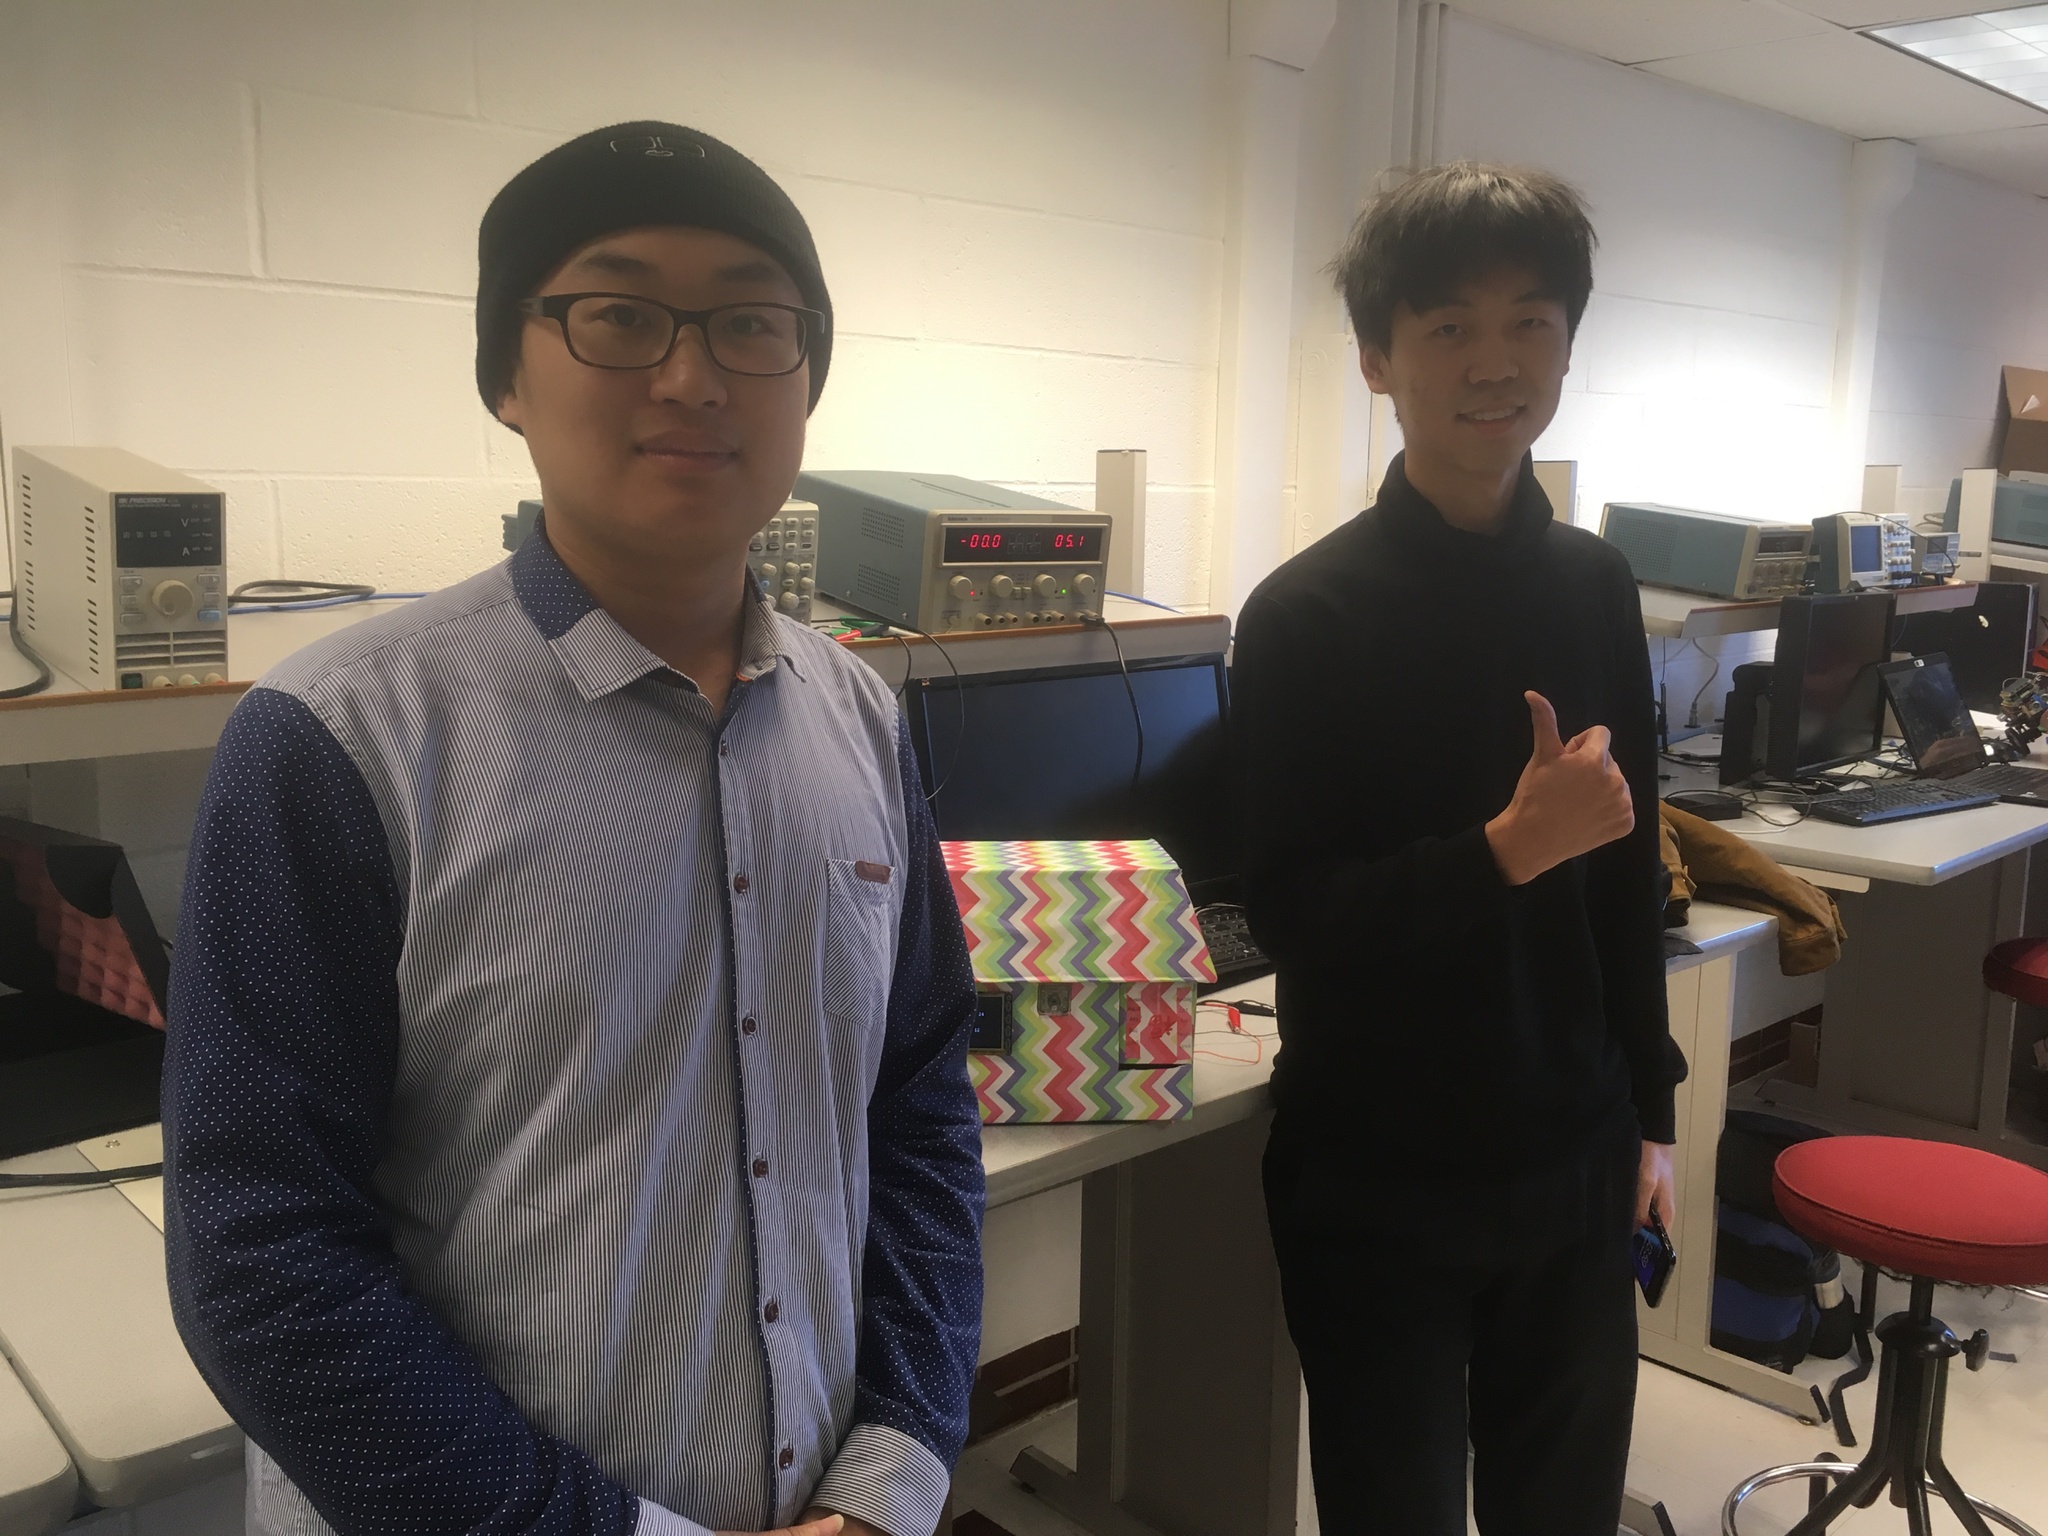
Project group picture
Boteng Yao
by277@cornell.edu
Face recognition and main Raspberry Pi python code implementation.
Ziran Zhang
zz668@cornell.edu
Sensor parts, web dashboard design and hardware-related jobs.
Parts List
- Raspberry Pi $35.00
- Raspberry Pi Camera V2 $25.00
- Decoration $3.99
- DHT - $5
- LDR - $1
- LEDs, Resistors and Wires, Servos - Provided in lab
Total: $69.99
References
PiCamera Documentopencv-python
Tower Pro Servo Datasheet
R-Pi GPIO Document
Adafruit IO
IFTTT
Code Appendix
// main.py import sys import faceidentifier import temphumidity import dashboard import getlight import glo import RPi.GPIO as GPIO import subprocess import time, threading import pygame from pygame.locals import * import os from collections import deque import board import adafruit_dht LDR = board.D13 level = 0 os.putenv('SDL_VIDEODRIVER', 'fbcon') os.putenv('SDL_FBDEV', '/dev/fb1') os.putenv('SDL_MOUSEDRV', 'TSLIB') # Track mouse clicks on piTFT os.putenv('SDL_MOUSEDEV', '/dev/input/touchscreen') GPIO.setmode(GPIO.BCM) GPIO.setup(17, GPIO.IN, pull_up_down=GPIO.PUD_UP) GPIO.setup(27, GPIO.IN, pull_up_down=GPIO.PUD_UP) GPIO.setup(26, GPIO.OUT, initial=GPIO.LOW) GPIO.setup(5, GPIO.OUT) GPIO.setup(6, GPIO.OUT) #Ac GPIO.setup(12, GPIO.OUT) #Door glo.hum = GPIO.PWM(5, 10) glo.hum.start(50) glo.door = GPIO.PWM(12, 1000/21.5) glo.door.start(0) glo.ac = GPIO.PWM(6, 1000/21.5) glo.ac.start(0) start_time = time.time() dhtDevice = adafruit_dht.DHT11(board.D19) pygame.init() pygame.mouse.set_visible(False) window_size = (width, height) = (320, 240) WHITE = 255, 255, 255 BLACK = 0,0,0 screen = pygame.display.set_mode(window_size) my_font = pygame.font.SysFont("monospace", 22) start_face = {'Face recorgnizing':(140,120)} iot_system = {'IoT system 1.0' :(140,120)} please_retry = {'Please retry':(140,120)} welcome = {'welcome! ':(140,120)} temp_humid = ["temperature: ", "humidility: "] position = [(140, 80), (140, 160)] s_per_sec = 10 fps_clock = pygame.time.Clock() def start_fact_recog(channel): global level level = 1 if faceidentifier.start_face_detection(): level = 2 else: level = 3 def quit_whole(channel): glo.code_run = False def dash_board(): dashboard.dash_board(GPIO) def get_value(): while glo.code_run: temp1 = temphumidity.getTempOrHumid(dhtDevice,"temp") humid1 = temphumidity.getTempOrHumid(dhtDevice,"humid") if temp1 and humid1: glo.temp = temp1 glo.humid = humid1 glo.light = getlight.getLight() time.sleep(5) GPIO.add_event_detect(17, GPIO.FALLING,callback=start_fact_recog, bouncetime=300) GPIO.add_event_detect(27, GPIO.FALLING,callback=quit_whole, bouncetime=300) t_temp = threading.Thread(target=get_value, name='get_temp') t_temp.start() t_dashboard = threading.Thread(target=dash_board, name='dashboard') t_dashboard.start() while glo.code_run: for event in pygame.event.get(): if event.type == pygame.QUIT: glo.code_run = False if level == 0: screen.fill(BLACK) for my_text, text_pos in iot_system.items(): text_surface = my_font.render(my_text, True, WHITE) rect = text_surface.get_rect(center=text_pos) screen.blit(text_surface, rect) pygame.display.flip() time.sleep(1) level = 4 if level == 1: screen.fill(BLACK) for my_text, text_pos in start_face.items(): text_surface = my_font.render(my_text, True, WHITE) rect = text_surface.get_rect(center=text_pos) screen.blit(text_surface, rect) if level == 2: glo.door.ChangeFrequency(1000/21.4) glo.door.ChangeDutyCycle(100 * 1.4/21.4) screen.fill(BLACK) for my_text, text_pos in welcome.items(): text_surface = my_font.render(my_text, True, WHITE) rect = text_surface.get_rect(center=text_pos) screen.blit(text_surface, rect) pygame.display.flip() time.sleep(0.65) glo.door.ChangeFrequency(1000/21.6) glo.door.ChangeDutyCycle(0) time.sleep(3) glo.door.ChangeFrequency(1000/21.6) glo.door.ChangeDutyCycle(100 * 1.6/21.6) time.sleep(0.37) glo.door.ChangeDutyCycle(0) level = 4 if level == 3: screen.fill(BLACK) for my_text, text_pos in please_retry.items(): text_surface = my_font.render(my_text, True, WHITE) rect = text_surface.get_rect(center=text_pos) screen.blit(text_surface, rect) pygame.display.flip() time.sleep(1) level = 0 if level == 4: temp_humid[0] = "Temperature: " + str(glo.temp) temp_humid[1] = "Humidity: " + str(glo.humid) screen.fill(BLACK) for i in range(len(temp_humid)): text_surface = my_font.render(temp_humid[i], True, WHITE) rect = text_surface.get_rect(center=position[i]) screen.blit(text_surface, rect) pygame.display.flip() pygame.display.update() fps_clock.tick(s_per_sec) GPIO.cleanup() pygame.quit()//dashboard.py import sys import time, threading import glo from Adafruit_IO import MQTTClient # Import Adafruit IO MQTT client. import temphumidity import getlight import board ADAFRUIT_IO_KEY = 'xxxxxxxxxxxxx'# See https://accounts.adafruit.com ADAFRUIT_IO_USERNAME = 'xxxxxxxxxxxxx' # to find your username. # Set to the ID of the feed to subscribe to for updates. ACTEM = 'ac' AUTO = 'auto' ACON = 'aconoff' DOOR = 'door' HUMID = 'humidifier' SYSTEMON = 'onoffbutton' LIGHT = 'light' def dash_board(GPIO): lock=threading.Lock() def connected(client): # Connected function will be called when the client is connected to Adafruit IO. # This is a good place to subscribe to feed changes. The client parameter # passed to this function is the Adafruit IO MQTT client so you can make # calls against it easily. #print('Connected to Adafruit IO! Listening for {0} changes...'.format(FEED_ID)) # Subscribe to changes on a feed named DemoFeed. client.subscribe(ACTEM) client.subscribe(AUTO) client.subscribe(ACON) client.subscribe(DOOR) client.subscribe(HUMID) client.subscribe(SYSTEMON) client.subscribe(LIGHT) def disconnected(client): # Disconnected function will be called when the client disconnects. print('Disconnected from Adafruit IO!') sys.exit(1) def message(client, feed_id, payload): # Message function will be called when a subscribed feed has a new value. # The feed_id parameter identifies the feed, and the payload parameter has # the new value. print('Feed {0} received new value: {1}'.format(feed_id, payload)) if feed_id == 'onoffbutton': print(payload) if payload == "ON": publish_init() glo.start_system = True else: glo.start_system = False publish_off() elif feed_id == 'auto': if payload == 'Auto': print("System has been changed to Auto model") glo.auto_start = True elif payload =='Manual': print("System has been changed to Manual model") glo.auto_start = False if glo.start_system and not glo.auto_start: if feed_id == "ac": print("feed_id == ac : {} ac_on: {}".format(feed_id == "ac", glo.ac_on)) if glo.ac_on: glo.set_temp = int(payload) print("AC has been changed to " + payload) period = 21.5 + 0.2 *((33 - glo.set_temp)/16) glo.ac.ChangeFrequency(1000/period) glo.ac.ChangeDutyCycle(100 * (period - 20)/period) elif feed_id == "aconoff": if payload=='ON': glo.ac_on = True client.publish(ACTEM, glo.set_temp) period = 21.5 + 0.2 *((33 - glo.set_temp)/16) glo.ac.ChangeFrequency(1000/period) glo.ac.ChangeDutyCycle(100 * (period - 20)/period) print("AC ON") elif payload=='OFF': glo.ac_on = False print("AC OFF") glo.ac.ChangeDutyCycle(0) elif feed_id == 'door': if payload=='Close': print("close door") glo.door.ChangeFrequency(1000/21.6) glo.door.ChangeDutyCycle(100 * 1.6/21.6) time.sleep(0.37) glo.door.ChangeDutyCycle(0) elif payload=='Open': glo.door.ChangeFrequency(1000/21.4) glo.door.ChangeDutyCycle(100 * 1.4/21.4) time.sleep(0.65) glo.door.ChangeDutyCycle(0) elif feed_id == 'light': if payload=='ON': print(feed_id) print("ON") GPIO.output(26, GPIO.HIGH) #Turn ON elif payload=='OFF': print(feed_id) print("OFF") GPIO.output(26, GPIO.LOW) elif feed_id == "humidifier": if payload == "0": print(payload) glo.hum.ChangeDutyCycle(0) elif payload == "1": print(payload) glo.hum.ChangeFrequency(5) glo.hum.ChangeDutyCycle(50) elif payload == "2": glo.hum.ChangeFrequency(8) glo.hum.ChangeDutyCycle(50) elif payload == "3": glo.hum.ChangeFrequency(10) glo.hum.ChangeDutyCycle(50) elif payload == "4": glo.hum.ChangeFrequency(15) glo.hum.ChangeDutyCycle(50) else: glo.hum.ChangeFrequency(20) glo.hum.ChangeDutyCycle(50) def publish_init(): time.sleep(1) lock.acquire() glo.ac_on = True client.publish(ACTEM, 26) client.publish(AUTO, "Auto") time.sleep(1) client.publish(DOOR, "OFF") time.sleep(1) client.publish(HUMID, 0) glo.hum.ChangeDutyCycle(0) lock.release() def publish_off(): time.sleep(1) client.publish(AUTO, "Manual") glo.auto_start = False lock.acquire() time.sleep(1) client.publish(ACON, "OFF") glo.ac_on = False glo.ac.ChangeDutyCycle(0) time.sleep(1) client.publish(DOOR, "OFF") time.sleep(1) client.publish(LIGHT, "OFF") GPIO.output(26, GPIO.LOW) time.sleep(1) client.publish(HUMID, 0) glo.hum.ChangeDutyCycle(0) lock.release() # Create an MQTT client instance. client = MQTTClient(ADAFRUIT_IO_USERNAME, ADAFRUIT_IO_KEY) # Setup the callback functions defined above. client.on_connect = connected client.on_disconnect = disconnected client.on_message = message # Connect to the Adafruit IO server. client.connect() client.loop_background() time.sleep(1) client.publish(SYSTEMON, "ON") def update_status(): while glo.code_run: client.publish("humidity", glo.humid) time.sleep(10) client.publish("temperature", glo.temp) time.sleep(10) client.publish("lux", glo.light) time.sleep(10) time.sleep(0.3) t_dash = threading.Thread(target=update_status, name='status') t_dash.start() while glo.code_run: print("system" + str(glo.start_system)) print("auto: " + str(glo.auto_start)) if glo.start_system and glo.auto_start: print("temp: " + str(glo.temp)) lock.acquire() if glo.temp > 30: glo.set_temp = 22 glo.ac_on = True client.publish(ACON, "ON") period = 21.5 + 0.2 *((33 - glo.set_temp)/16) glo.ac.ChangeFrequency(1000/period) glo.ac.ChangeDutyCycle(100 * (period - 20)/period) client.publish(ACTEM, 22) elif glo.temp > 24: glo.set_temp = 25 glo.ac_on = True client.publish(ACON, "ON") period = 21.5 + 0.2 *((33 - glo.set_temp)/16) glo.ac.ChangeFrequency(1000/period) glo.ac.ChangeDutyCycle(100 * (period - 20)/period) client.publish(ACTEM, 25) else: print("Close the AC") client.publish(ACON, "OFF") glo.ac_on = False glo.ac.ChangeDutyCycle(0) time.sleep(1) print("humid: " + str(glo.humid)) if glo.humid < 10: print("Level1") client.publish(HUMID, 5) glo.hum.ChangeFrequency(20) glo.hum.ChangeDutyCycle(50) elif glo.humid < 20: print("Level2") client.publish(HUMID, 3) glo.hum.ChangeFrequency(10) glo.hum.ChangeDutyCycle(50) elif glo.humid < 30: client.publish(HUMID, 1) glo.hum.ChangeFrequency(5) glo.hum.ChangeDutyCycle(50) else: client.publish(HUMID, 0) glo.hum.ChangeDutyCycle(0) time.sleep(1) print("Light: " + str(glo.light)) if glo.light < 500: client.publish(LIGHT, "ON") GPIO.output(26, GPIO.HIGH) else: client.publish(LIGHT, "OFF") GPIO.output(26, GPIO.LOW) lock.release() time.sleep(10) GPIO.cleanup()//Face recognition import cv2 import sys import numpy as np from time import sleep from picamera import PiCamera import io from picamera.array import PiRGBArray import time def fact_detection(recognizer, faceCascade, start): Id = 0 end = time.time() with PiCamera() as camera: camera.resolution = (600, 600) rawCapture = PiRGBArray(camera, size=(600, 600)) for frame in camera.capture_continuous( rawCapture, format="bgr", use_video_port=True ): image = frame.array gray = cv2.cvtColor(image,cv2.COLOR_BGR2GRAY) # Detect the face in the image faces = faceCascade.detectMultiScale(gray) print("Found {0} faces!".format(len(faces))) for (x, y, w, h) in faces: cv2.rectangle(image, (x, y), (x+w, y+h), (0, 255, 0), 2) Id, conf=recognizer.predict(gray[y:y+h,x:x+w]) if(Id==4 and conf < 110): Id = "Ziran" elif(Id==5 and conf < 110): Id = "Boteng" else: Id = "No permission" print(Id) cv2.putText(image, str(Id), (x, y), cv2.FONT_HERSHEY_PLAIN, 1.5, (0, 255, 0), 2) print(Id, conf) if Id == "Ziran" or Id == "Boteng": return True else: rawCapture.truncate( 0 ) print("waiting for open") end = time.time() if end - start > 10: return False #sleep(1) def start_face_detection(): recognizer = cv2.face.LBPHFaceRecognizer_create() recognizer.read('/home/pi/IoT_Control_Center_pi/identify_people/trainner.yml') cascPath = "/home/pi/IoT_Control_Center_pi/training-data/haarcascade_frontalface_default.xml" # Create the haar cascade faceCascade = cv2.CascadeClassifier(cascPath) start = time.time() if fact_detection(recognizer, faceCascade, start): return True return False
  //temphumidity.py
  import time
  import board
  import adafruit_dht

  def getTempOrHumid(dhtDevice, kind):
      try:
          temperature_c = dhtDevice.temperature
          humidity = dhtDevice.husmidity
          if(kind == 'temp'):
              return temperature_c
          elif(kind == 'humid'):
              return humidity
      except:
          return False